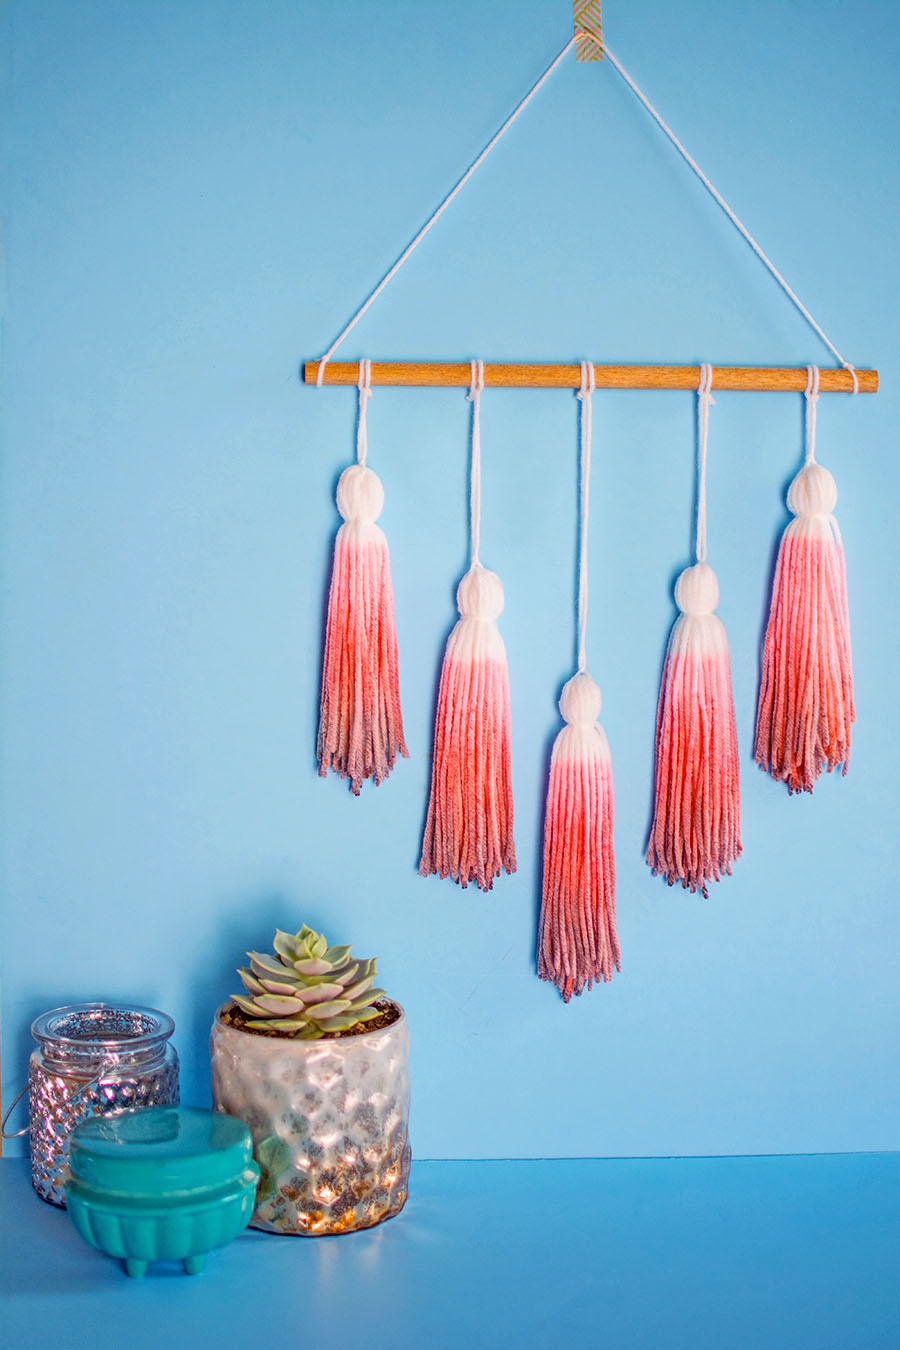
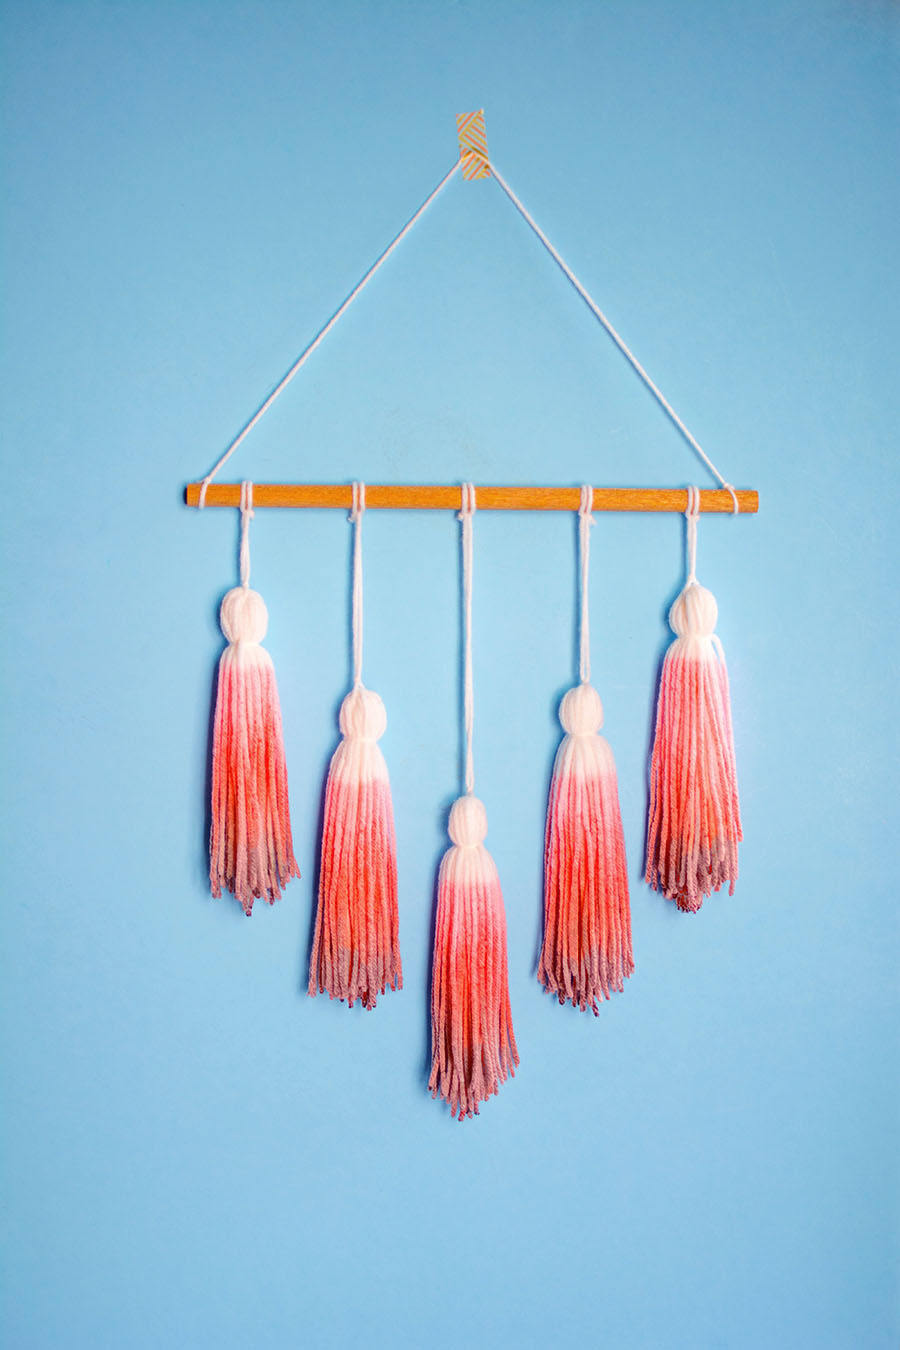
Hi, guys! I’m sharing this really fun and colorful DIY yarn tassel wall hanging on the PBteen blog today! The best part is that it was dyed with Kool-Aid, which is easy to find (local grocery store), inexpensive, and smells bomb.
I’m having a lot of fun doing projects for PBteen because it prompts me to explore different areas of crafting and focus on a more specific audience. I’ve been wanting to try a project like this for a long time and thought it would be a great fit for an easy and summery DIY for teens to try. Of course, I hope these projects will have something for everyone to enjoy, and I hope all of you do :). Head on over and bring a teen with you! See you there! Click here for the tutorial.
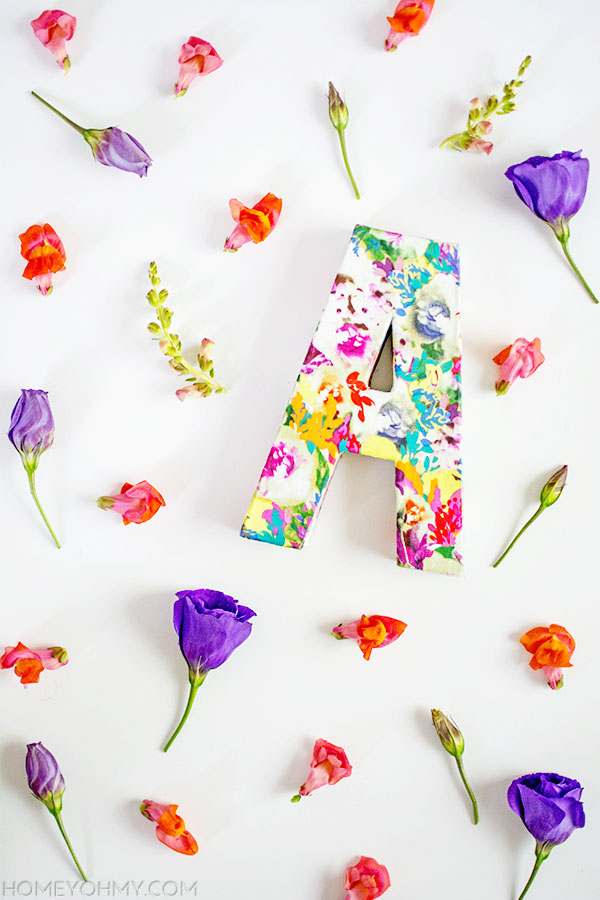
If you follow me on Instagram, you might have seen that I recently got this *gorgeous* floral fabric that I wasn’t sure about how to use. I mentioned I’d probably be making a pillow cover with it, and I will (because how can my pillow-cover-obsessed-self not) but I also wanted to do something with it in a way where I could just look at it. Seriously, I think I would have been ok with just hanging it up on the wall, but I’ve had monograms on my mind lately and found this the perfect opportunity to create a decorative one.
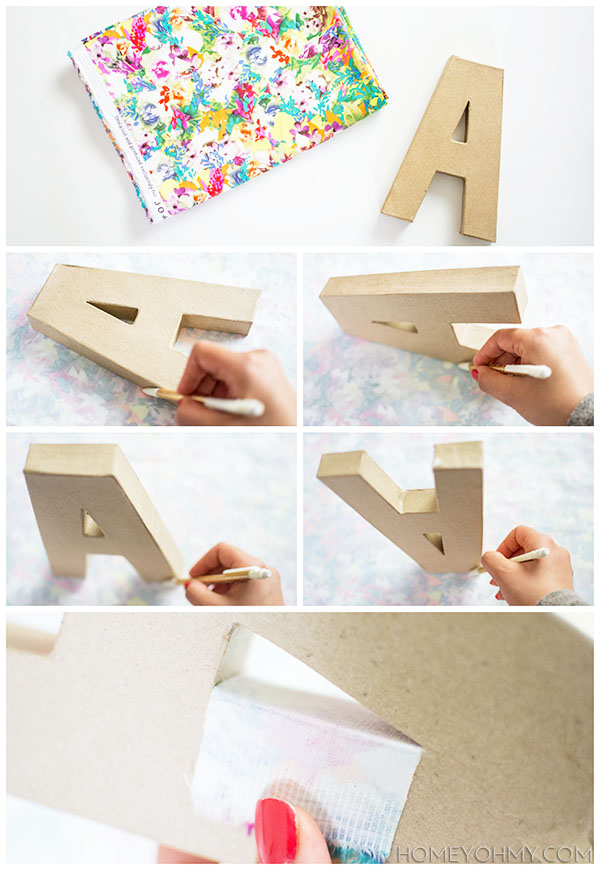
I got the fabric and cardboard “A” from Joann Fabrics, and all I did was trace every side of the monogram onto the fabric with a pencil and cut each piece out. For the inner edges and hole in the A, I measured the needed length and cut out a piece of fabric first, then marked in pencil where I’d need to cut the width. After all the pieces were cut, I used a foam brush and Mod Podge to glue them all on to the monogram, then applied Mod Podge over all the fabric as a final protective coat.
Per my usual, preferred crafting style, I kept it really simple and easy, which I think was best for this floral fabric to be the star of the show. I freaking love it. Floral is a pattern I will always love, and the bright colors on this one are spreading some much welcomed summery vibes. I can’t stop looking at it, which is all I wanted to do in the first place- success!
What do you think of floral patterns? I’m hoping to incorporate more of them into my home, and for sure will be making that pillow case and sharing how that turns out on Instagram, possibly along with how it looks hanging up on the wall haha! Seriously, I think this fabric would look good in a frame or as a photo mat, no? Too far?
June already!! I know, I say that about every month (and I say THAT after I say that about every month), but it’s seriously insane how we’re already fast approaching the half-way point of this year. Thinking about it that way really puts into focus how fast time is flying, right?
So with summer here (according to the solstice it isn’t officially summer, but to me, my first day back at the beach for the year marks the beginning of summer) I’ve got a bunch of fun, summer DIYs lined up, starting with this one. I came across this tutorial for making string bowls at Laughing Kids Learn and while it’s aimed at kids, I think this is a lot of fun for anyone to do. Plus, it’s super easy and doesn’t require a lot of materials. Win win win.
Materials:
Plastic wrap
Bowl Jute twine Mod Podge
Foam brush or bristle brush
Spray paint
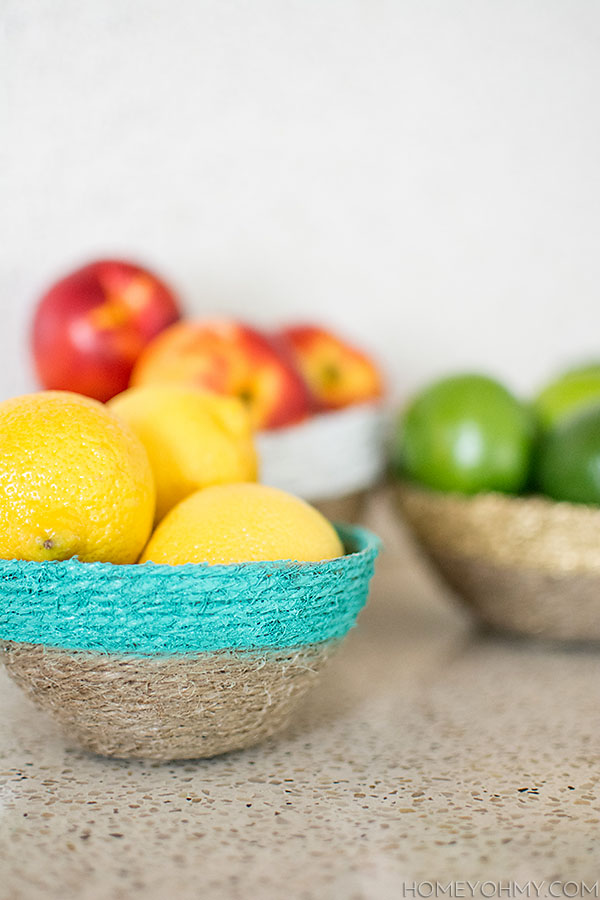
I recommend wearing gloves if you want to get hands-in with the string and possibly adjust it after you’ve slathered it in glue. First, wrap three layers of plastic wrap around a bowl. I saw later that the extra layers really help with the removal process of the layer that comes in contact with the string. Next, slather on Mod Podge over the plastic wrap. This will help the string stick on to the bowl.
Coil the string until you make a small disc, then stick it on to the center of the bottom of the bowl. Glob on Mod Podge over the disk, then continue wrapping the string around the bowl while globbing on more Mod Podge all over the string. By globbing, I mean apply the Mod Podge generously! Make sure not to wrap the string all the way to the edge of the bowl. You’ll need this edge to grab onto in order to remove the bowl.
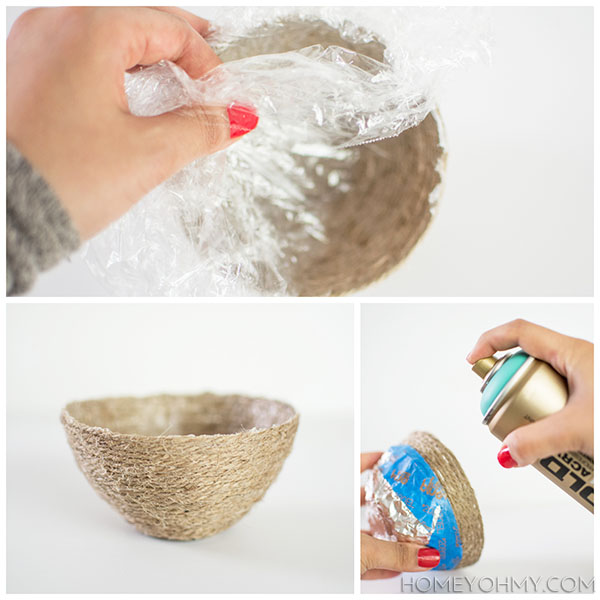
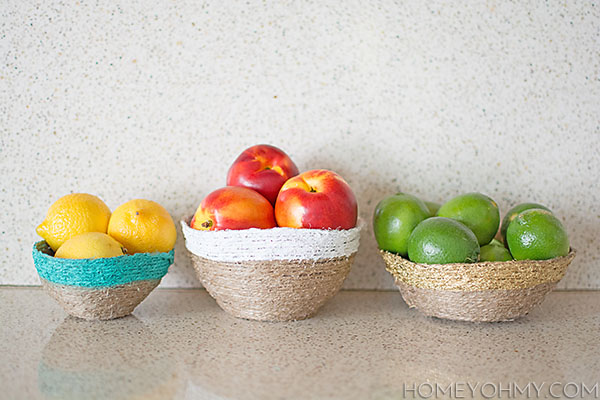
Let the bowl dry completely, then pull down at the plastic wrap while holding the edge of the bowl to remove the string bowl, rotating it so that you pull at every edge and angle. If I were to do this again, I’d probably spray a light coat of cooking spray on the bowl for easier removal, but you can do without it with just a little bit of patience. Remove the plastic wrap, then tape on a design of your choice. I kept it really simple and just spray painted the rims of the bowls, using painters tape and foil to cover the bottom of the bowl.
String and glue. Isn’t that neat? The bowls are pretty flexible and warp under weight, but they’re still pretty sturdy and hold well.
Aside from being functional, they make a cute, summery display when filled with fruit. I can see myself also using the smallest one as a catch-all, though I already have a bunch around the apartment. Having a container everywhere to throw random knick knacks into is my favorite way of “organizing”.
What do you think of these bowls? What would you use them for?
I often find myself wanting to share with you all some of the inspiring things I come across while procrastinating from writing a blog post. Seriously, it’s when I need to get work done that I get the most lost in link after link of “Man I wish I had time to make that” or “I need those pillows now.”
Thing is, not all of these finds conveniently fit a common theme or idea most of the time. They’re random, which is usually how I browse. SO, I’m thinking I’ll occasionally just lump these finds in a casual, Friday post where we can chat about what’s currently swoon-tastic. Shall we?
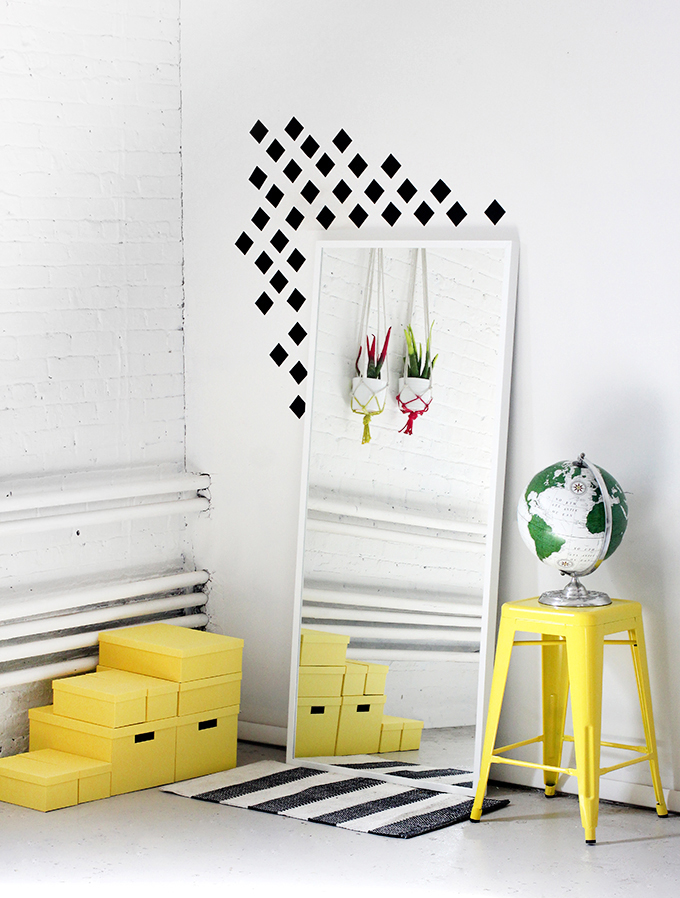
This diamond wall art from I Spy DIY is so simple and striking, and in my favorite color palette. And just look at how beautifully this shot is styled!! Even the reflection in the mirror was so thoughtfully calculated.
So I think I’m going to have to do something like this in order to finally have myself a bar cart (who else feels left out from the bar cart party?). I love how this IKEA hack bar cart from Sugar and Cloth is simple and chic. Really, you could do this DIY with any free-standing bookshelf or table, and the possibilities for customization are endless!
Oh, summer. Isn’t this scene dreamy? Poppytalk shared this sneak peek of their upcoming Target collaboration launching June 22nd. So far I love everything I’m seeing!
I have yet to own cocktail napkins or find a use for them anytime soon, but these… I very much want these. I can’t get over how adorable the tassel embellishments are. See the DIY tutorial at House of Earnest.
Smitten Studio shared this DIY built-in shelving, but lets spend a moment here to take it all in… isn’t Sarah’s style amazing?? I absolutely love everything she does.
My backyard envy continues to grow. designlovefest pretty much threw the perfect backyard dinner party, or at least this is how I’d imagine the perfect party would go down. There are so many gorgeous details!
I’m really digging the geometric copper design that Mandi from Vintage Revivals created on her photo frame mat, but what’s more is that quote. It so perfectly fits her personality, and I also have to agree with it ;) as long as I don’t think too hard about it… ha!! (Did I just admit that I’m boring?)
Guys… this is probably my favorite home tour yet. Katherine Vo’s home is the perfect mix of chic and cozy. I can easily see myself living in a space like this. Oh and what’s that? A blue velvet couch?? You guys know how I feel about blue velvet couches, right?
Hope this was an inspirational weekend send-off! Which of these inspires you the most? Will you be DIY’ing anything this weekend or throwing a perfect backyard party?
This boring mesh trash can has been bothering me for years. I’ve had it since college, and sure it gets the job done, but again, it’s boring. The main reason I put off doing something about it was because I didn’t know what to do about it.
I first tried applying fabric around the outside with Mod Podge, which was a complete fail. I think the mesh, combined with the can not being uniform in diameter, were the factors to blame (it couldn’t have been me, right?!). So, I shoved it in a corner and kept dumping trash in it, until I came across some trim on clearance at Joann Fabrics.
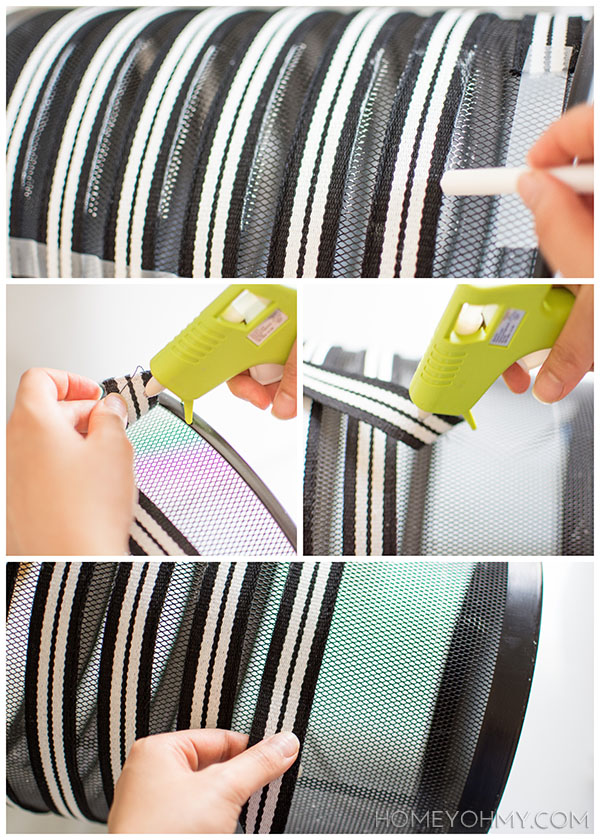
Black and white stripes- so very me! I love how ideas will just hit me when I come across something random, like trim. I got 6 yards of it and spiraled it around the trash can, using tape to hold it in place.
I then used chalk to mark on the can where the trim was placed, as a guide for when I’d glue it on later. Using a hot glue gun, I first glued down one end of the trim. After unraveling the trim, I spiraled it around the can again, this time gluing down the trim onto the can as I went, making sure to follow along the path of the chalk marks.
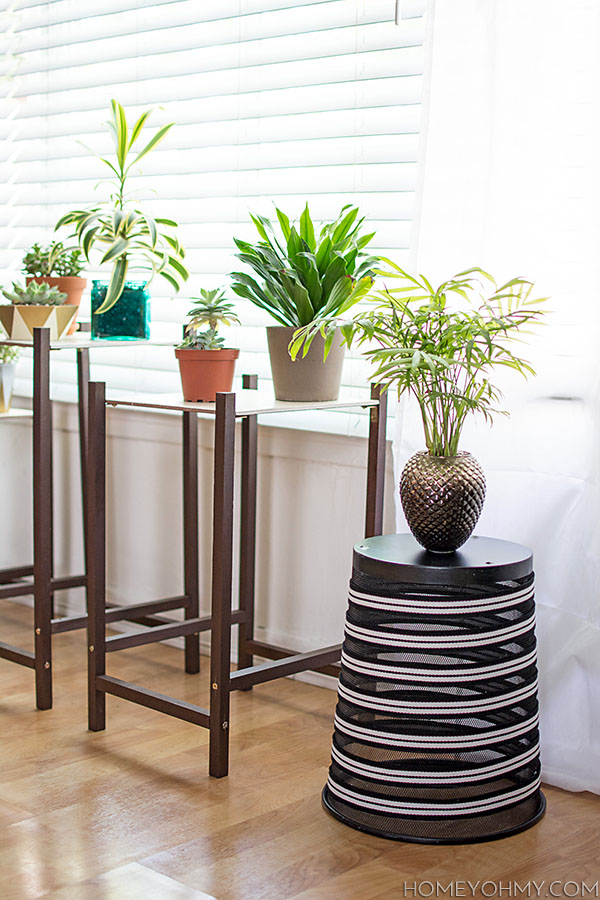
After all the trim was glued down, I took a damp paper towel and wiped off all the chalk. And then I was like hey, if I turn it upside down, it could be a plant stand!
That was how it all went down. I’m always a fan of how the simplest ideas can completely repurpose things I was so close to ditching. It’s the BEST. The stand is sitting pretty next to the other plant stands I previously made.
I feel like there are tons of mesh trash cans out there like this one. Do you have one? Have you done anything to make your trash can less boring?
 I got the fabric and cardboard “A” from Joann Fabrics, and all I did was trace every side of the monogram onto the fabric with a pencil and cut each piece out. For the inner edges and hole in the A, I measured the needed length and cut out a piece of fabric first, then marked in pencil where I’d need to cut the width. After all the pieces were cut, I used a foam brush and Mod Podge to glue them all on to the monogram, then applied Mod Podge over all the fabric as a final protective coat.
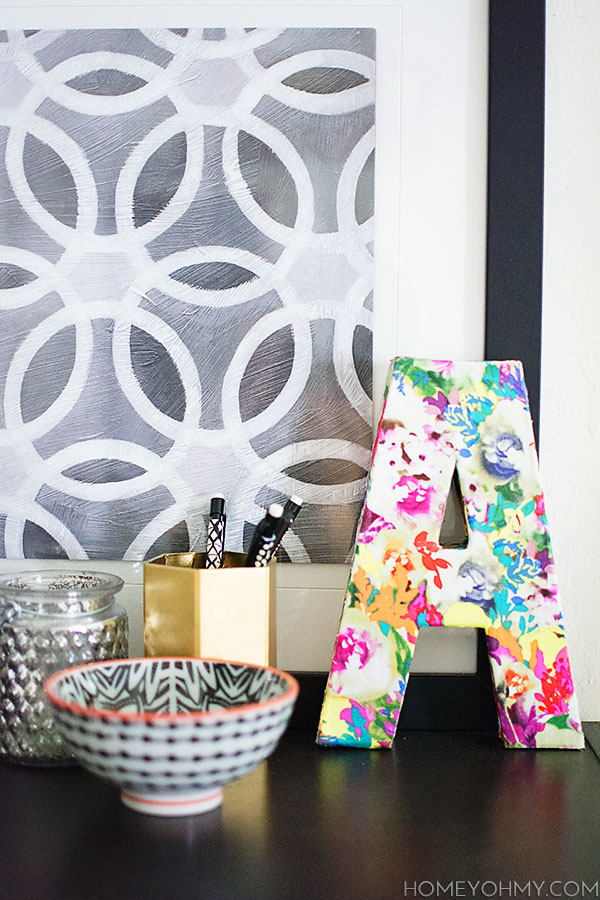 Per my usual, preferred crafting style, I kept it really simple and easy, which I think was best for this floral fabric to be the star of the show. I freaking love it. Floral is a pattern I will always love, and the bright colors on this one are spreading some much welcomed summery vibes. I can’t stop looking at it, which is all I wanted to do in the first place- success!
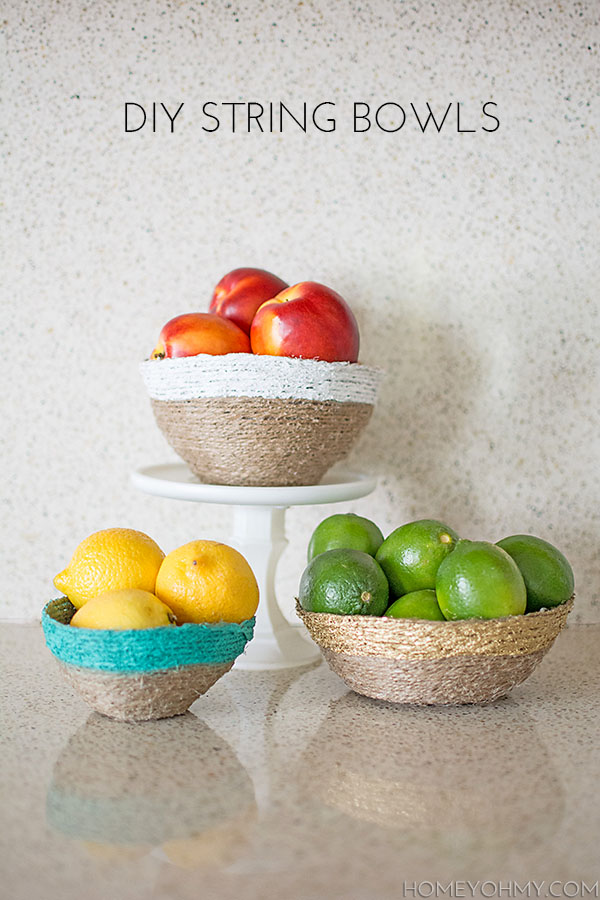 June already!! I know, I say that about every month (and I say THAT after I say that about every month), but it’s seriously insane how we’re already fast approaching the half-way point of this year. Thinking about it that way really puts into focus how fast time is flying, right?
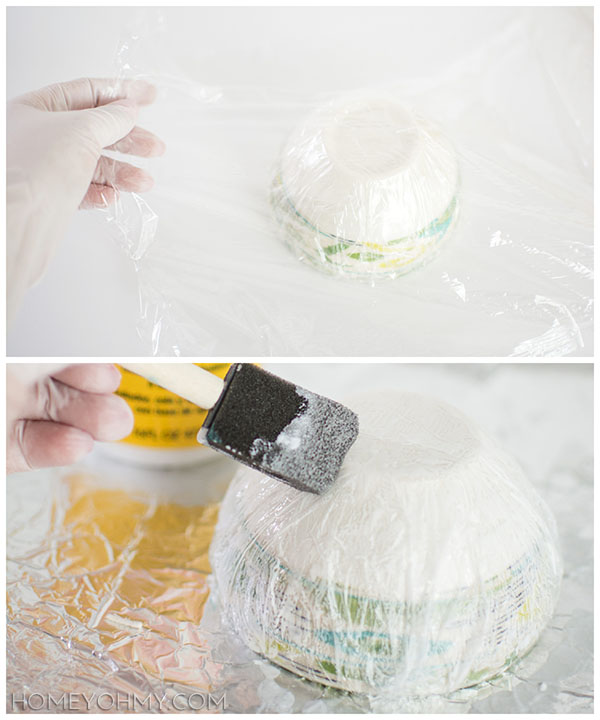 I recommend wearing gloves if you want to get hands-in with the string and possibly adjust it after you’ve slathered it in glue. First, wrap three layers of plastic wrap around a bowl. I saw later that the extra layers really help with the removal process of the layer that comes in contact with the string. Next, slather on Mod Podge over the plastic wrap. This will help the string stick on to the bowl.
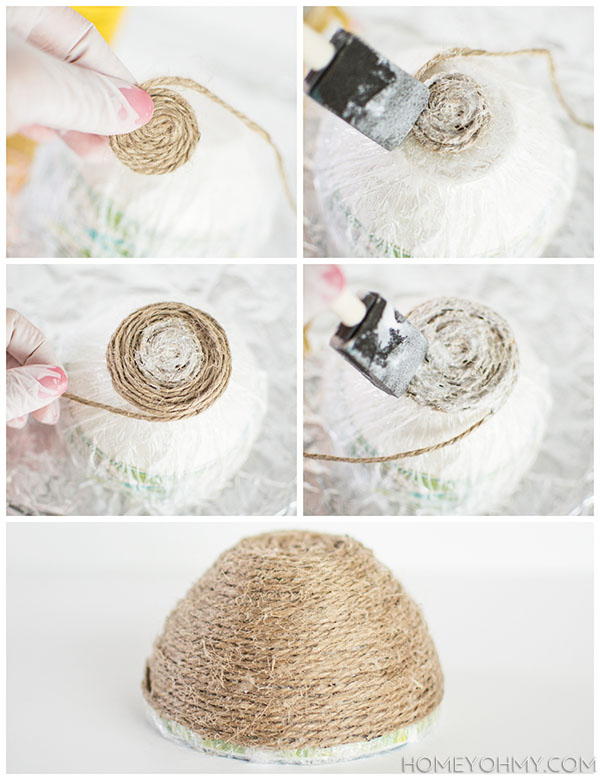
 Let the bowl dry completely, then pull down at the plastic wrap while holding the edge of the bowl to remove the string bowl, rotating it so that you pull at every edge and angle. If I were to do this again, I’d probably spray a light coat of cooking spray on the bowl for easier removal, but you can do without it with just a little bit of patience. Remove the plastic wrap, then tape on a design of your choice. I kept it really simple and just spray painted the rims of the bowls, using painters tape and foil to cover the bottom of the bowl.
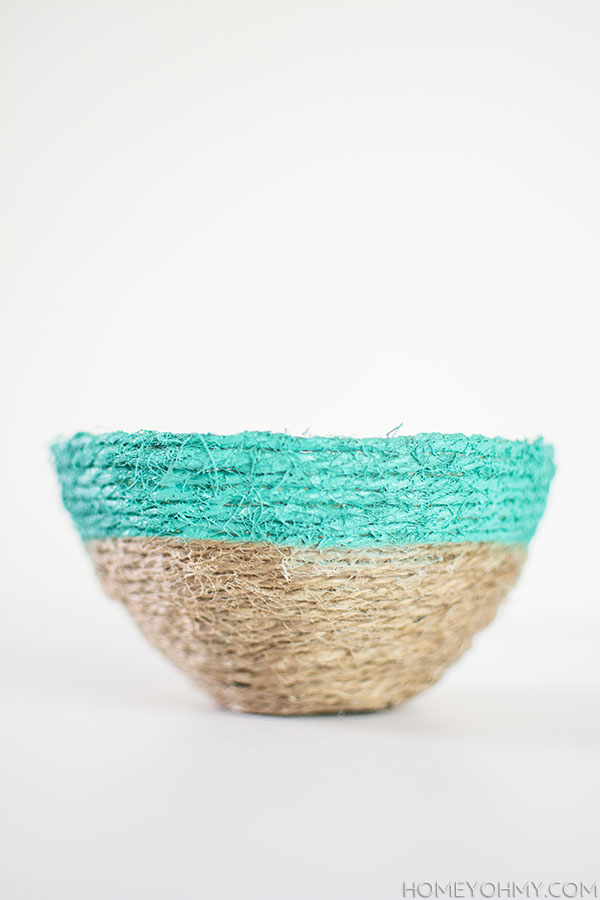
 Aside from being functional, they make a cute, summery display when filled with fruit. I can see myself also using the smallest one as a catch-all, though I already have a bunch around the apartment. Having a container everywhere to throw random knick knacks into is my favorite way of “organizing”.
 This
This 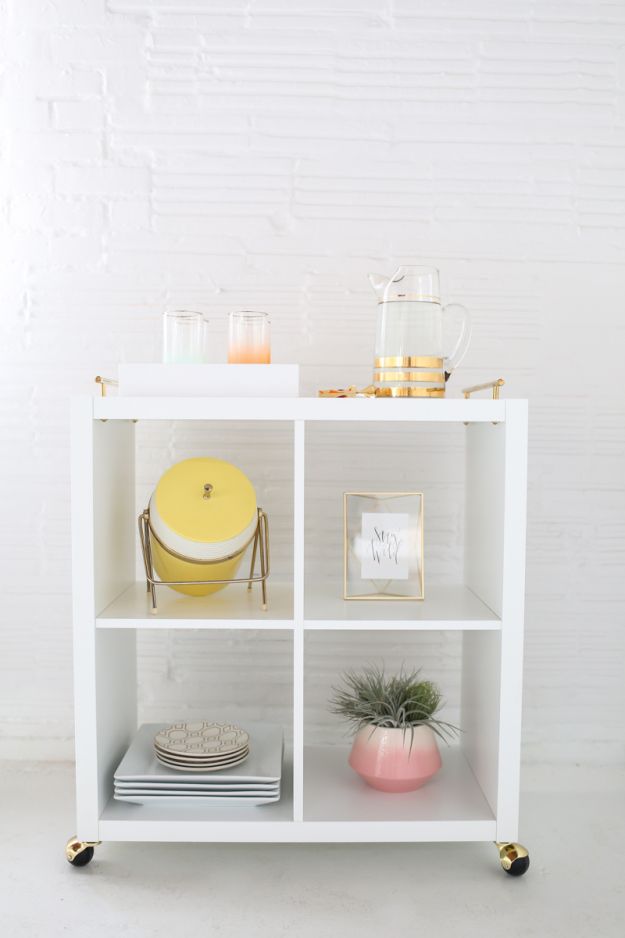 So I think I’m going to have to do something like this in order to finally have myself a bar cart (who else feels left out from the bar cart party?). I love how this
 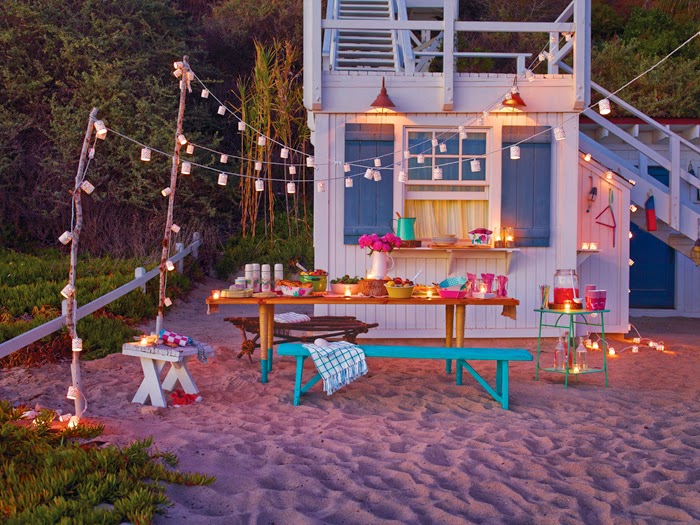 Oh, summer. Isn’t this scene dreamy?
 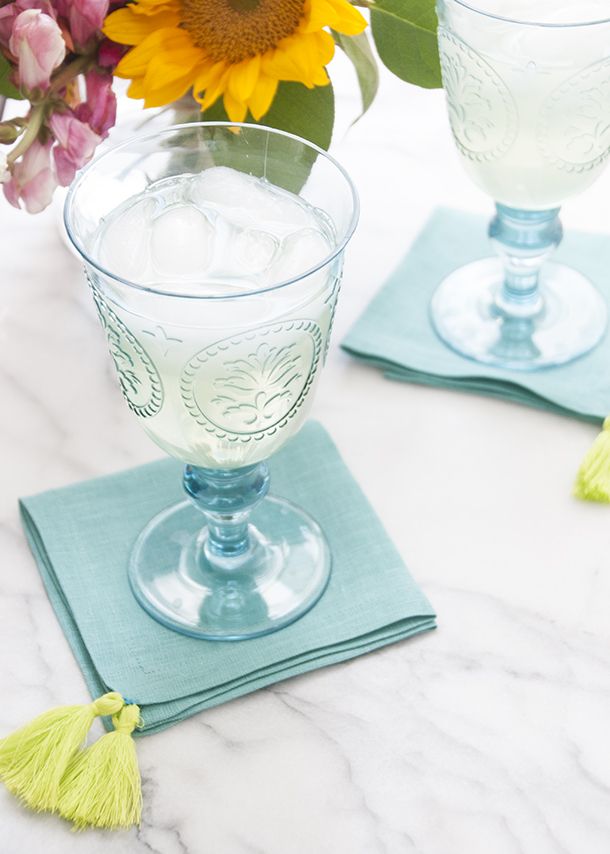 I have yet to own cocktail napkins or find a use for them anytime soon, but these… I very much want these. I can’t get over how adorable the tassel embellishments are. See the DIY tutorial at
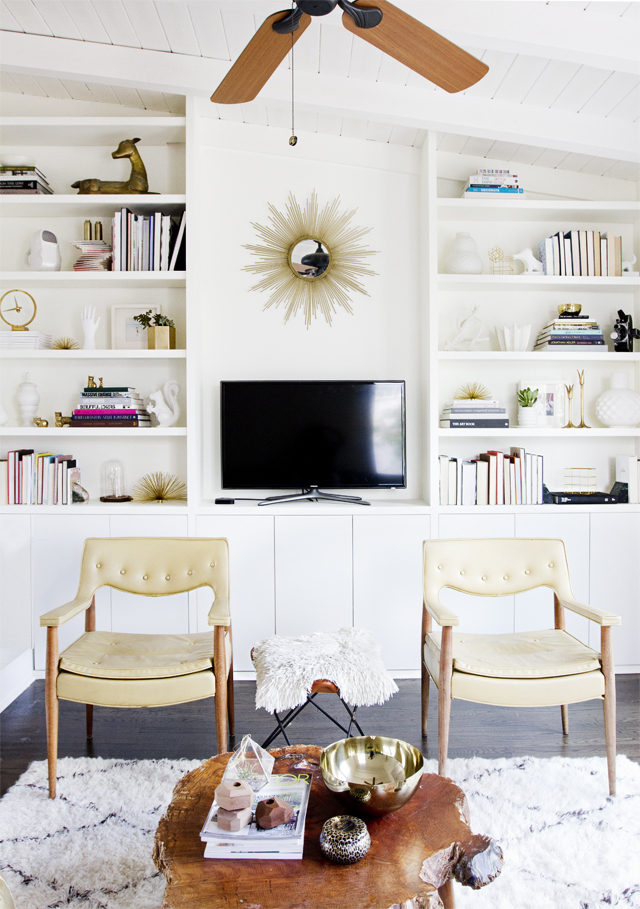
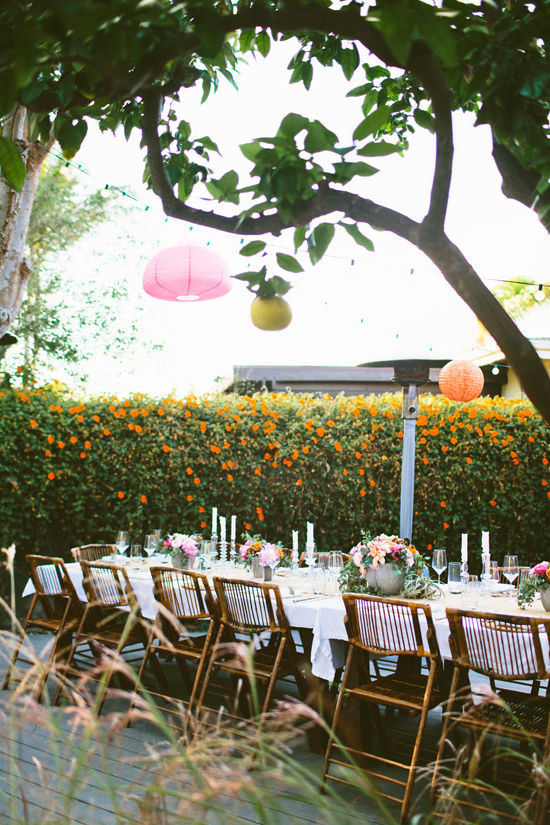 My backyard envy continues to grow. designlovefest pretty much threw the perfect
 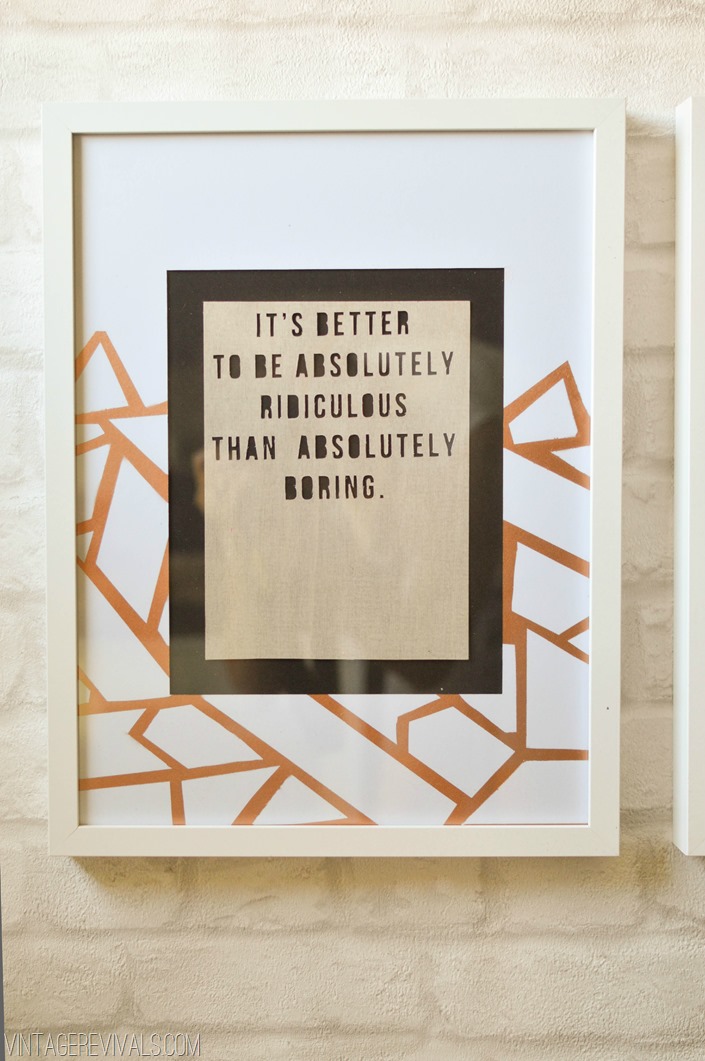 I’m really digging the geometric copper design that Mandi from Vintage Revivals created on her
 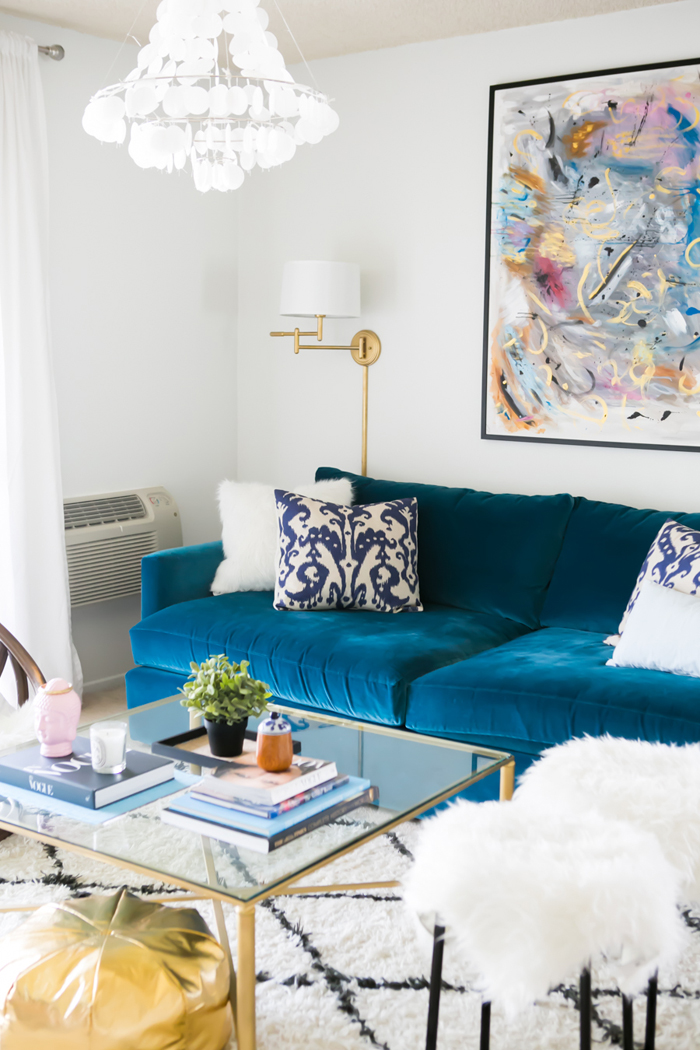 Guys… this is probably my favorite home tour yet.
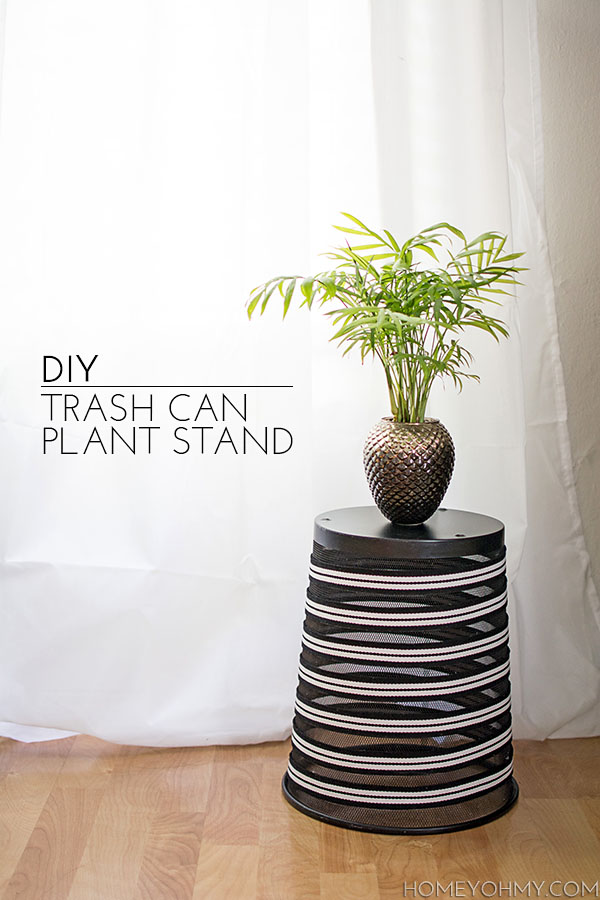
 I first tried applying fabric around the outside with Mod Podge, which was a complete fail. I think the mesh, combined with the can not being uniform in diameter, were the factors to blame (it couldn’t have been me, right?!). So, I shoved it in a corner and kept dumping trash in it, until I came across some trim on clearance at Joann Fabrics.
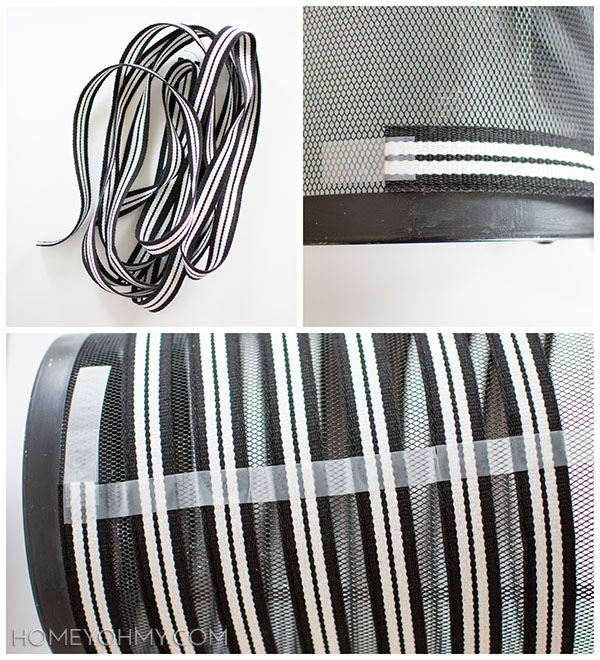 Black and white stripes- so very me! I love how ideas will just hit me when I come across something random, like trim. I got 6 yards of it and spiraled it around the trash can, using tape to hold it in place.