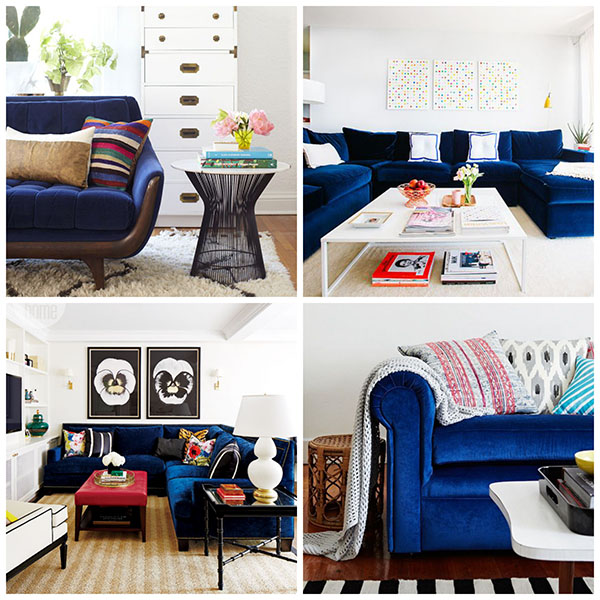
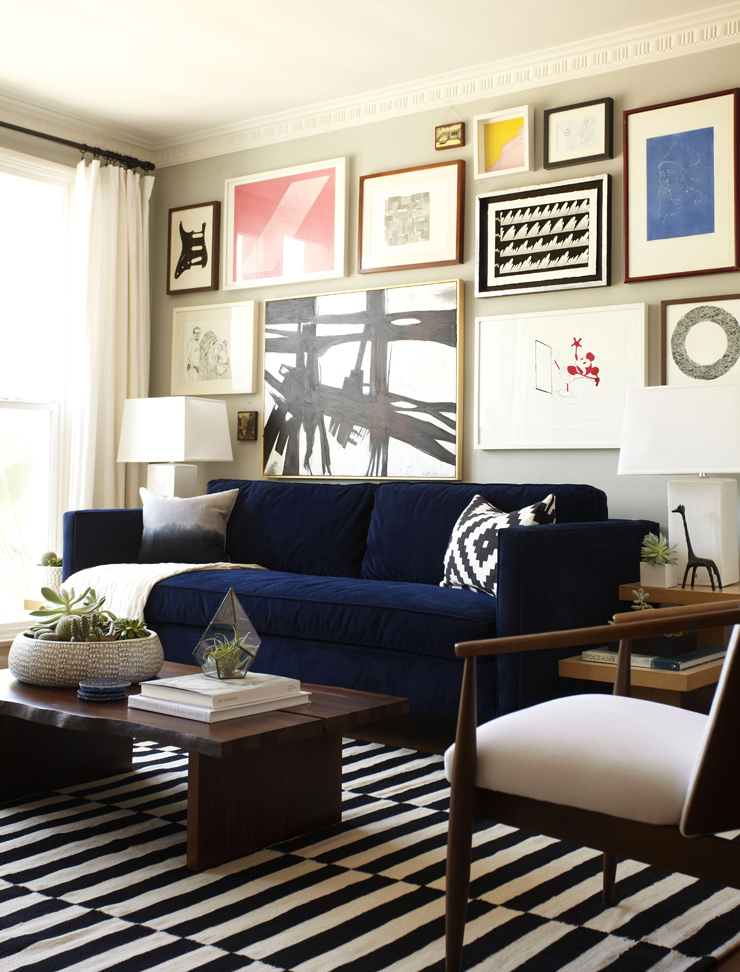
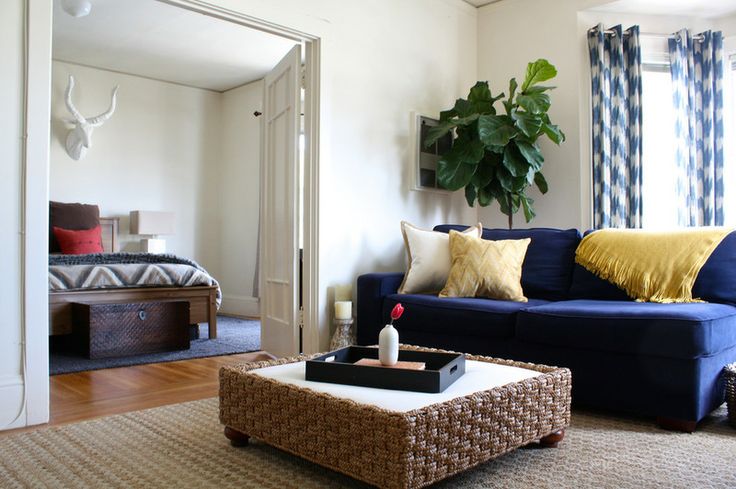
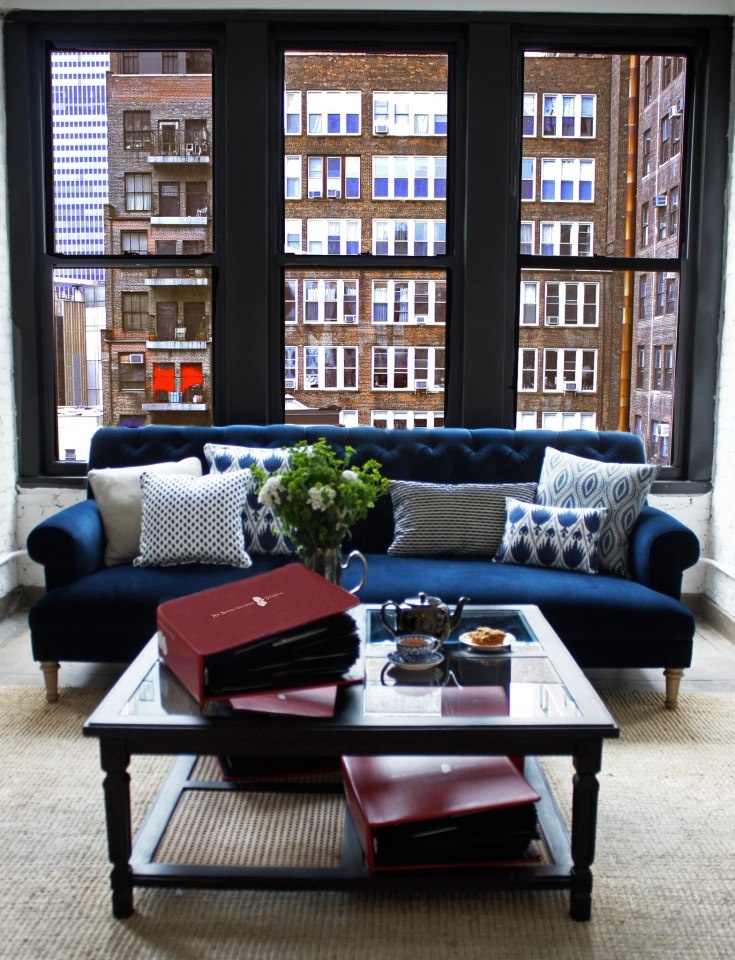
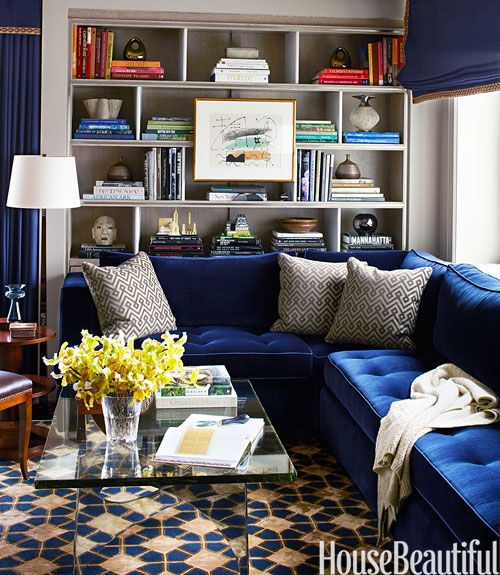
I recently discovered that I LOVE blue velvet couches. Not only did I notice I’ve been pinning a lot of them, but I found myself wishing my couch was blue when I was photographing my no sew pillow covers, and since then I couldn’t get my mind off of the idea. It’s in these situations I go scouring for inspiration and gawking at all the amazing styling ideas. Do you ever do that? Come, gawk with me.
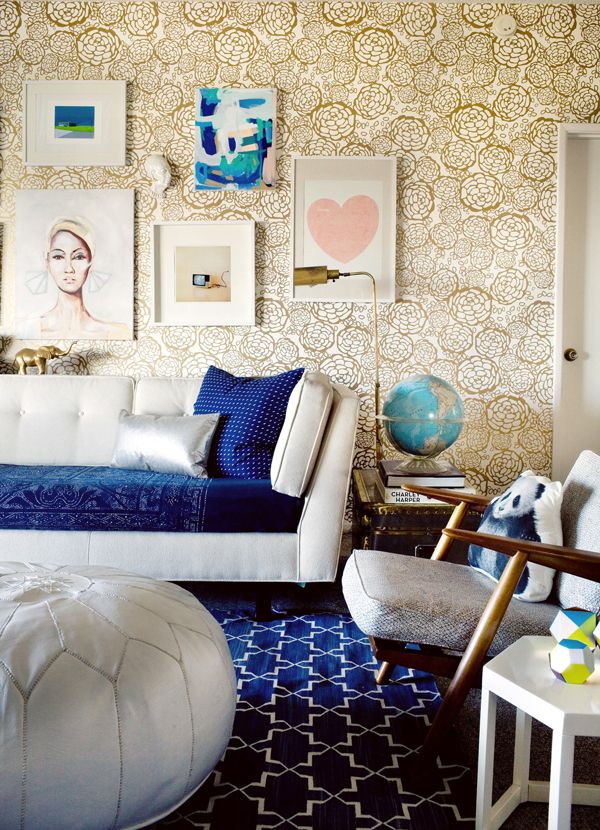
Not sure what’s going on with the two tone couch here, but I dig it, especially how it looks with that amazing blue rug.
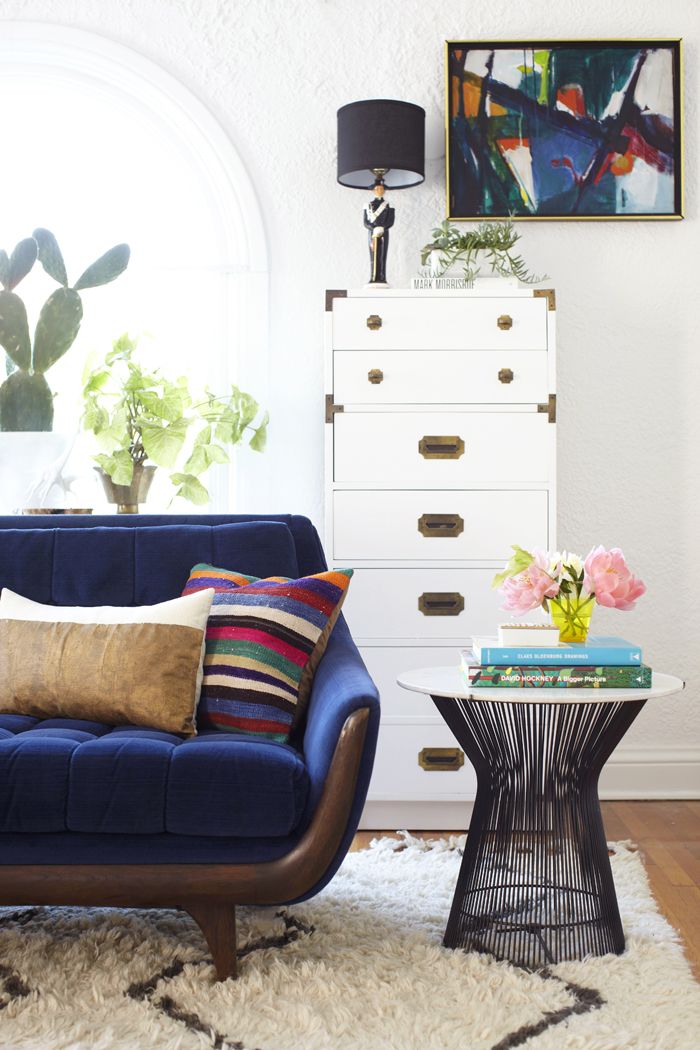
I’m down for taking a baby step by starting with a blue velvet chair.
Or a bench!
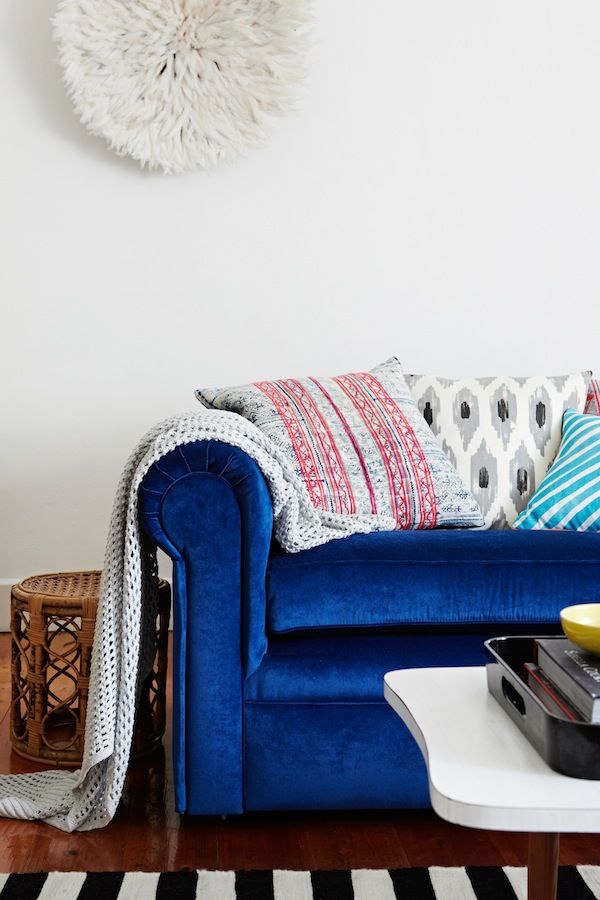
I’m mostly looking at royal blue velvet, which I love for being dark and sultry and both feminine and masculine. I’m obsessed, and what’s even more is that a lot of these spaces were created by Emily Henderson, who is just out of this world crazy talented how is she even real just amazing wow. This is the first time I’m noticing that she likes using blue velvet in a lot of her spaces. I’m sold even more.
What do you think of blue velvet couches? Which of these spaces is your favorite?
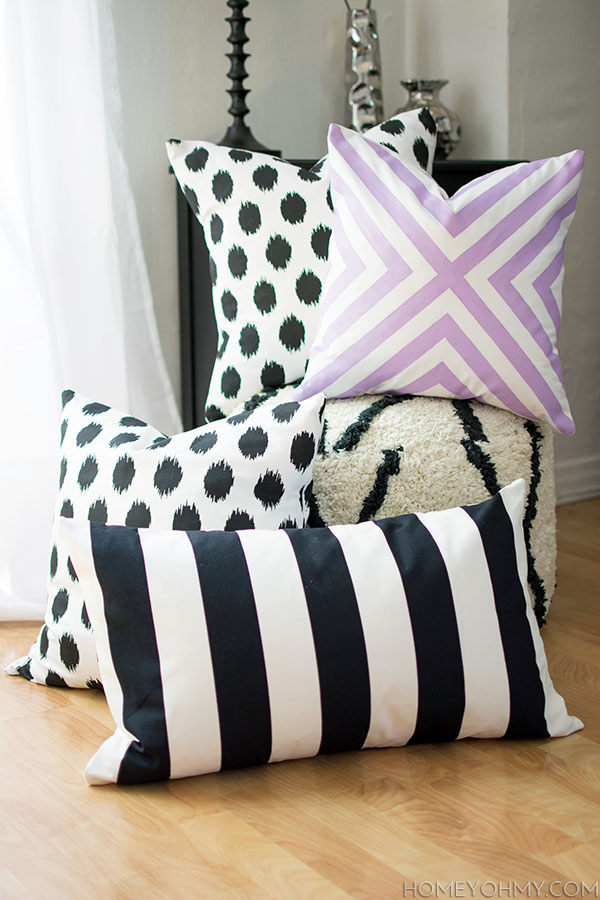
I’ve been itching to update the pillows in my living room, and I came across a dilemma I’m wondering if you can relate to… Why is it so hard to find pillow cases in simple patterns and colors?? Or I guess the difficulty comes in hoping someone out there mass produced exactly what I envisioned in my head, ha! This situation absolutely calls for a DIY.
I had shared a no sew pillow cover a while back in a post about using up leftover fabric, and it ended up being the most popular idea from that post, so in addition to feeding my pillow addiction, I thought I’d do an updated tutorial with more details on the how-to.
Materials:
-fabric (I got the ikat polka dot fabric here and the striped fabric here– this pillow size is 16 x 26 in. I painted the purple one, which I’ll briefly show in a bit)
–Unique Stitch Adhesive
-fabric scissors (I LOVE the way cutting fabric with fabric scissors feels… weird?)
-ruler
-pencil
-iron
For the ikat polka dot pillows, the pillow inserts are 20 x 20 in., so I measured and cut out a 20 x 20 in. piece and two 15 x 20 inch pieces after ironing the fabric. This will be an envelope style pillow, which is the easiest way to go for no sew.
Starting with the 15 x 20 in. pieces, I folded back about an inch on one of the 20 in. sides of each piece and ironed it down. Then I applied the Unique Stitch under the fold to glue it down. This glue is my secret weapon to no sew projects because it holds SO well. I’ve found that the key is to apply enough so that it lightly soaks through the layers of fabric. If I can feel the stickiness of the glue on my fingers as I press down on the fabric after, I know the job is done.
I lined up a 15 x 20 in piece with the top edge of the 20 x 20 in. piece with the fabric faces facing each other. I glued the fabric pieces together where the red lines are in the photo above, which are supposed to be about a quarter inch away from the edges. Then I glued on the other 15 x 20 in. piece lined up with the bottom of the 20 x 20 in. piece. The folded edges of the 15 x 20 in. pieces should be overlapped.
I let the glue dry for at least a couple hours before turning the covers inside out and stuffing them with the pillows. Karate chop that pillow and it’s done!
Now here’s another dilemma I encountered… Why is it so hard to find fabric in simple patterns and colors?? Maybe this next one isn’t as simple as I think it is, but it was simple to create it myself.
All I did was take some plain white fabric, tape on my design with painters tape, then pounce on the paint over it. I like using the Martha Stewart Satin Paints for fabric since no fabric medium is required. The color I used is hydrangea purple, which is an unusual choice because I don’t own a single purple thing. I was really digging the color for this pillow cover though, and the pretty name sealed the deal. This cover by the way is for an 18 x 18 in. pillow, and the envelope flaps were cut to 13 x 18 in. each.
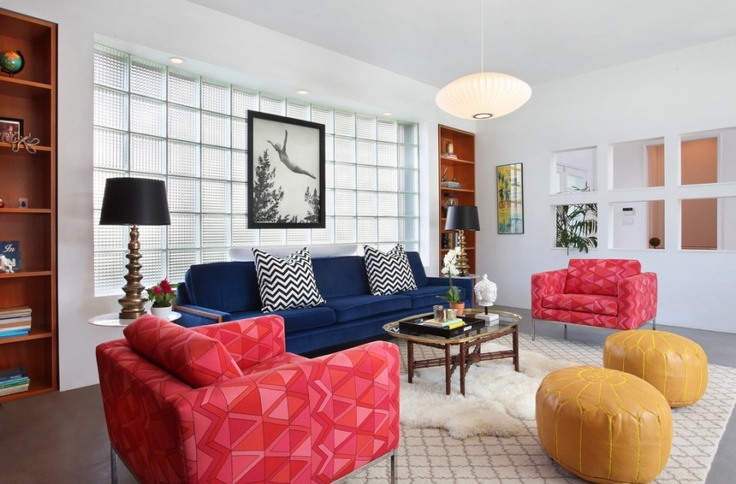
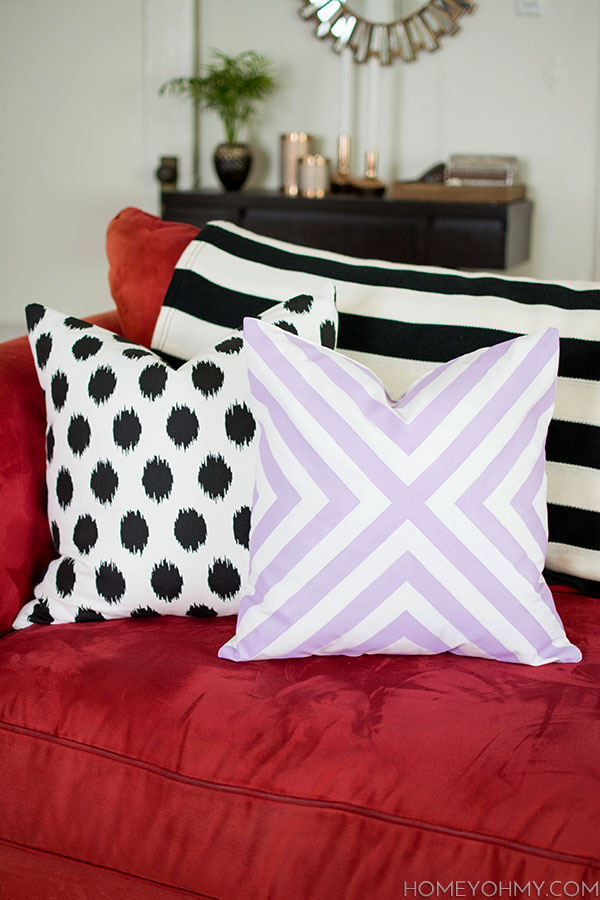
I’m really liking the way the purple looks on my red couch, and of course the black and white never fails to please me. If you feel like the ikat polka dot pillow looks familiar, it might be because you saw the pattern in the background of this post.
**Quick pillow tip- If you’re looking for down-filled pillows, try the clearance section of HomeGoods, TJ Maxx, or any of the other stores like those. The pillow covers will be ugly, BUT, you’ll be getting the down-filled pillow inside them for cheap and then making your own custom pillow covers, like I did with this project!
Which of these three pillow patterns is your favorite? My boyfriend said the purple one was his favorite. Another unusual development!
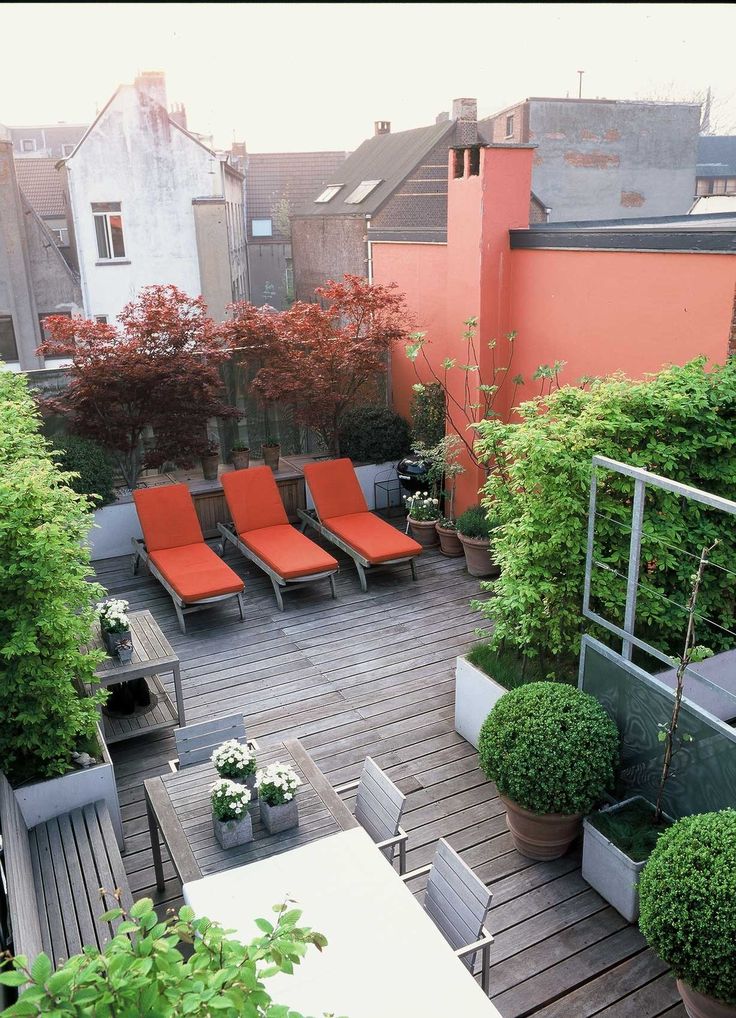
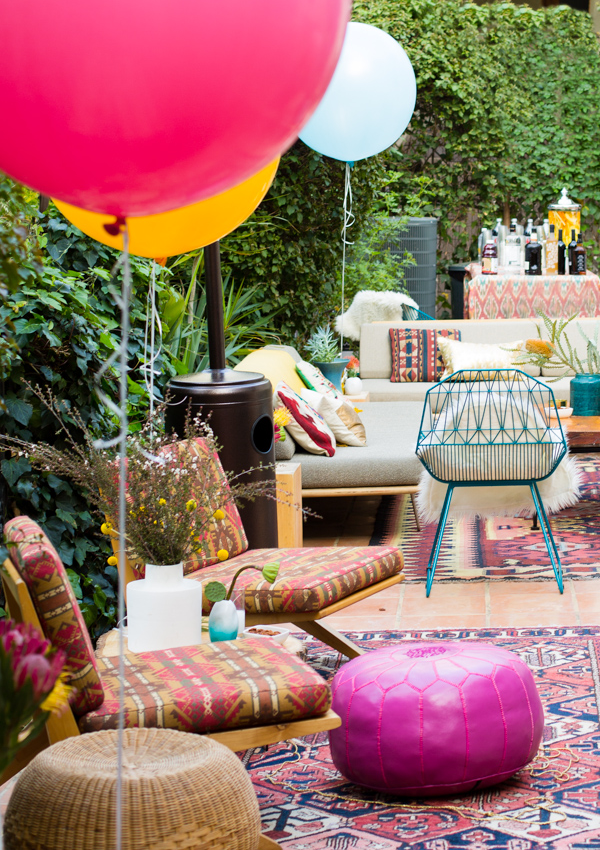
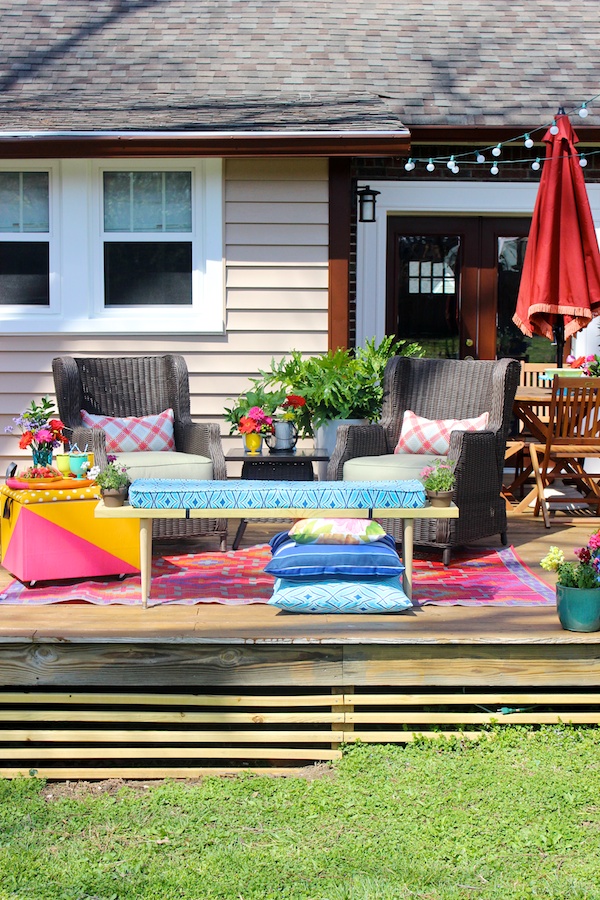
It is HOT outside. According to the calendar, it isn’t technically summer yet for another month, but it more than feels like it here in so-cal. It’s got me thinking a lot about outdoor lounging, though really right now I’m preferring the air-conditioned indoors! Still, the season of patio envy is upon us, and my patio-less self has been daydreaming about the kind of outdoor space I’d want to hang out in.
So for my pretend patio, I imagine this mix of classic, glam, modern, and boho details. I do enjoy mixing styles a bit, but overall I like to create a space that’s chic. What do you think of the space? While I was putting it together, my boyfriend so adorably requested that I put in a grill, haha! No no, so sorry, there’s no room for your grill. In all seriousness though, a grill would be badass and it’s certainly on my outdoor-must-haves list.
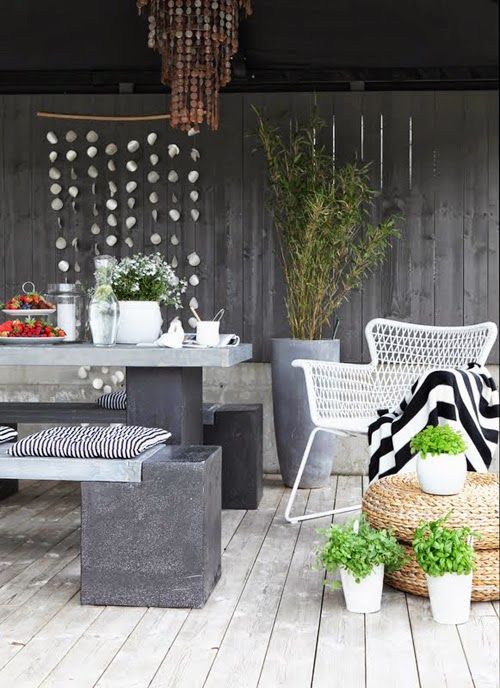
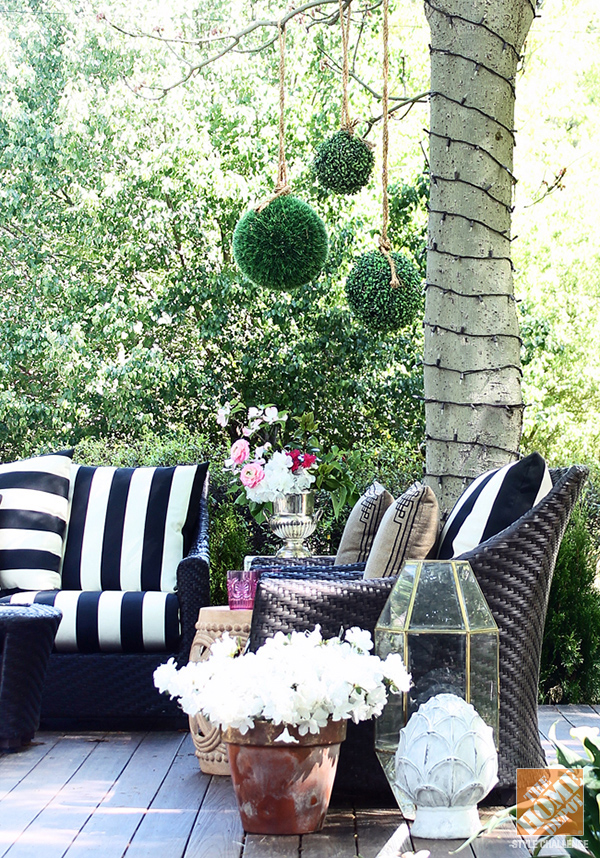
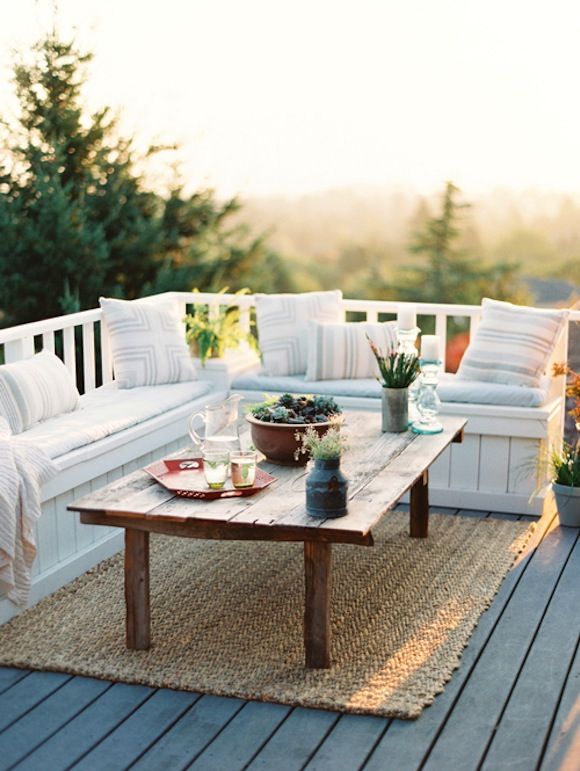
And just for fun, I want to share some seriously inspiring outdoor spaces I’ve been admiring. Which of these outdoor spaces would you want for your own?
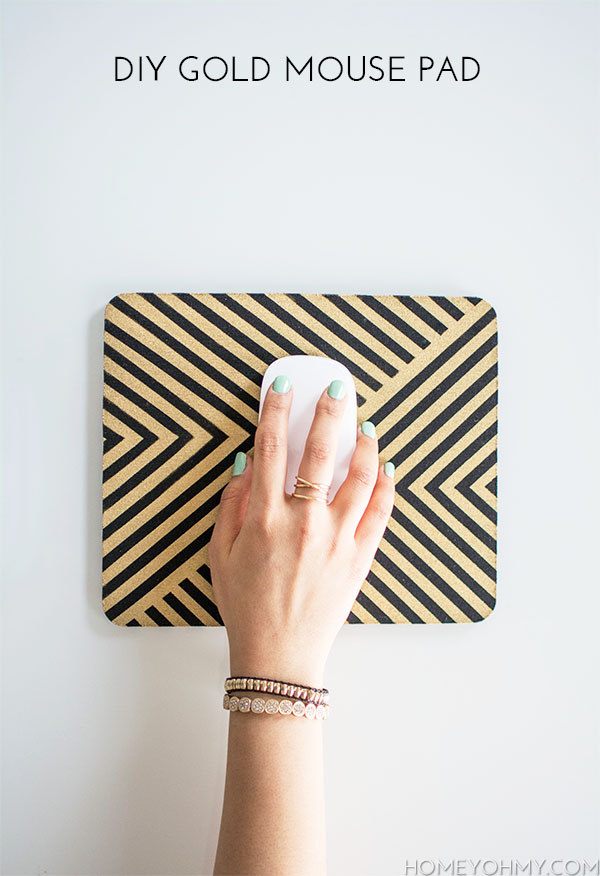
Another addition to my work space! Thus, it had to be gold. Back story… there was an attempt before this one to make my mouse pad cuter and I ended up ruining it :(. So this is attempt #2 and it turned out WAY better than my original plan. Isn’t it great how things work out that way?
Here’s how it goes.
I taped my design on the black mouse pad with 1/4 inch vinyl tape, then spray painted the mouse pad with one heavy coat of Rust-Oleum Gold Spray Paint. After removing the tape, I let the mouse pad dry for a couple hours before dabbing on a layer of Mod Podge with a foam pouncer. It dries clear, I promise! This is to protect the spray painted design from potentially rubbing off, though I did try scraping at it and it’s on there pretty good.
That’s it! Pretty simple, but makes a huge statement, and definitely much better than keeping the mouse pad plain like it was before, don’t cha think?
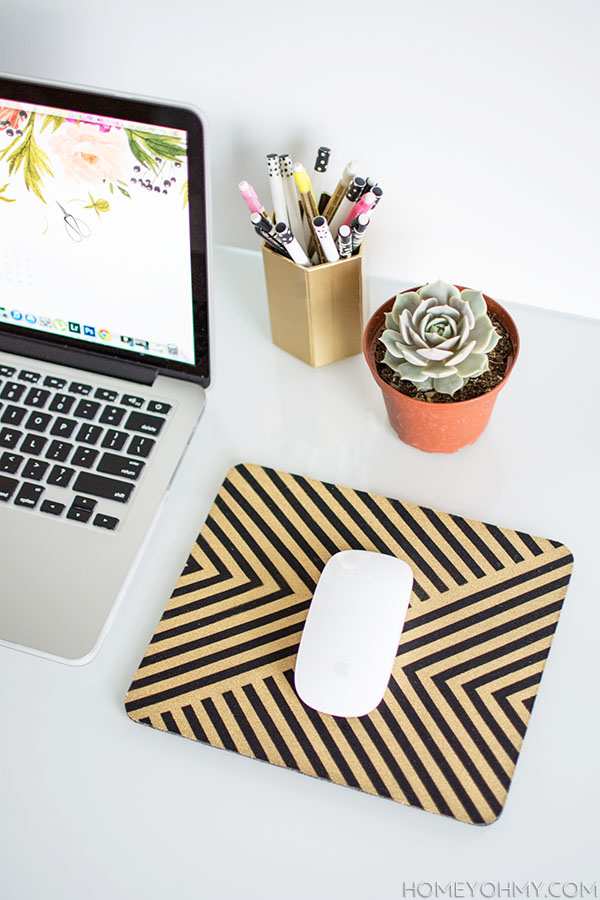
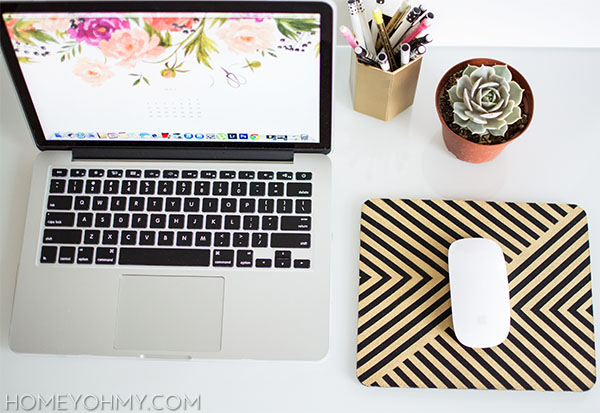
My favorite mouse pad EVER, and I couldn’t be happier with it. This is actually pretty similar to my gold leaf jewelry tray, which you might want to check out if you haven’t already!
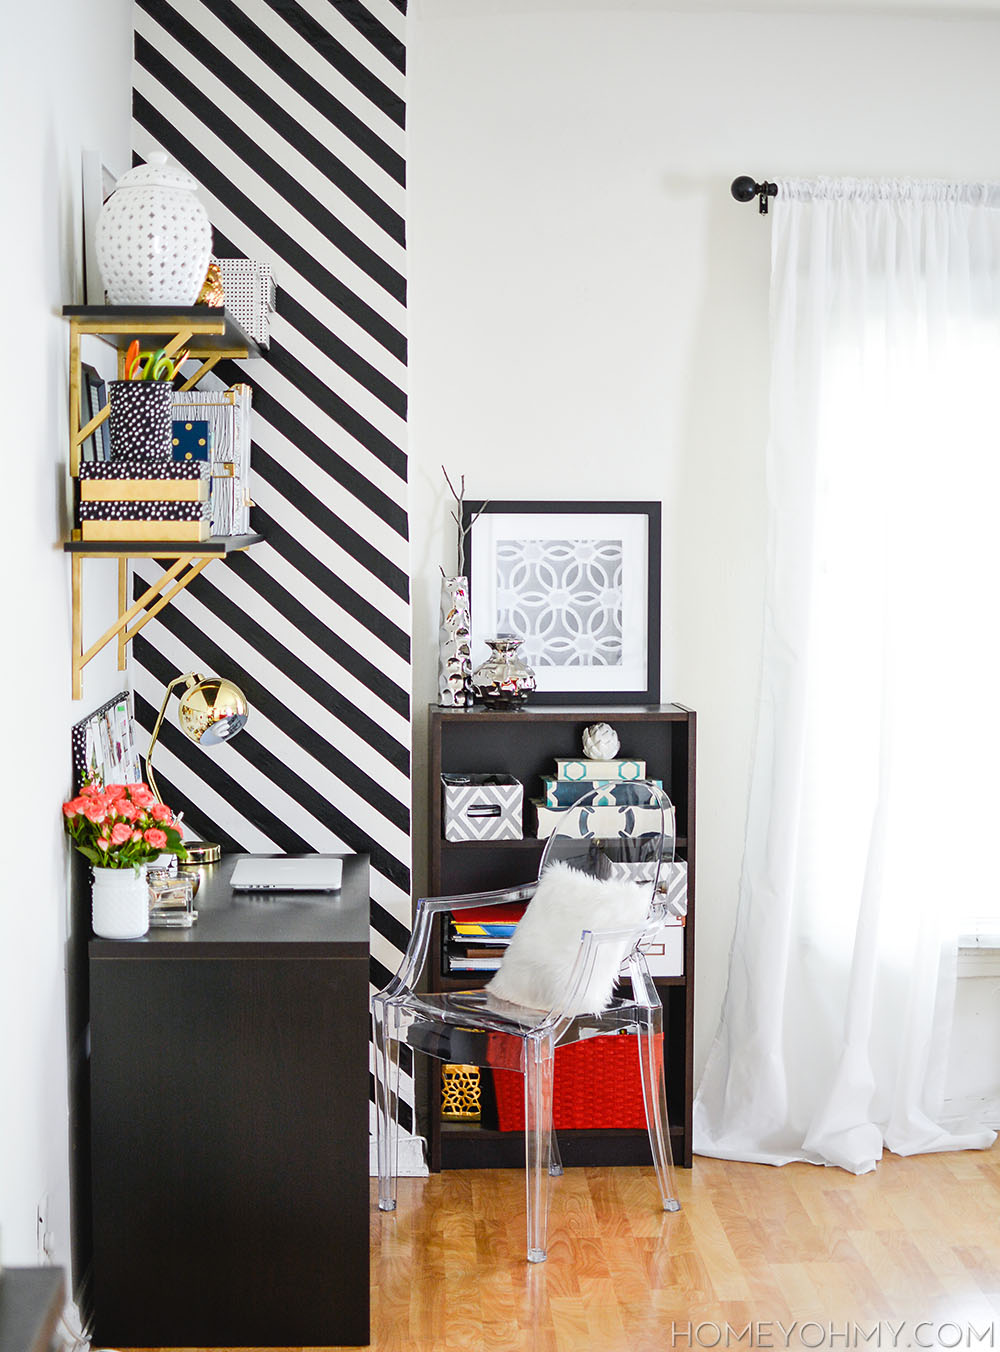
The response I’ve been getting for my work space reveal has been phenomenal. I didn’t expect everyone to love it as much, if not more, than I do and it’s been so amazing reading all your comments and positive feedback everywhere. Thank you all SO much for the love <3.
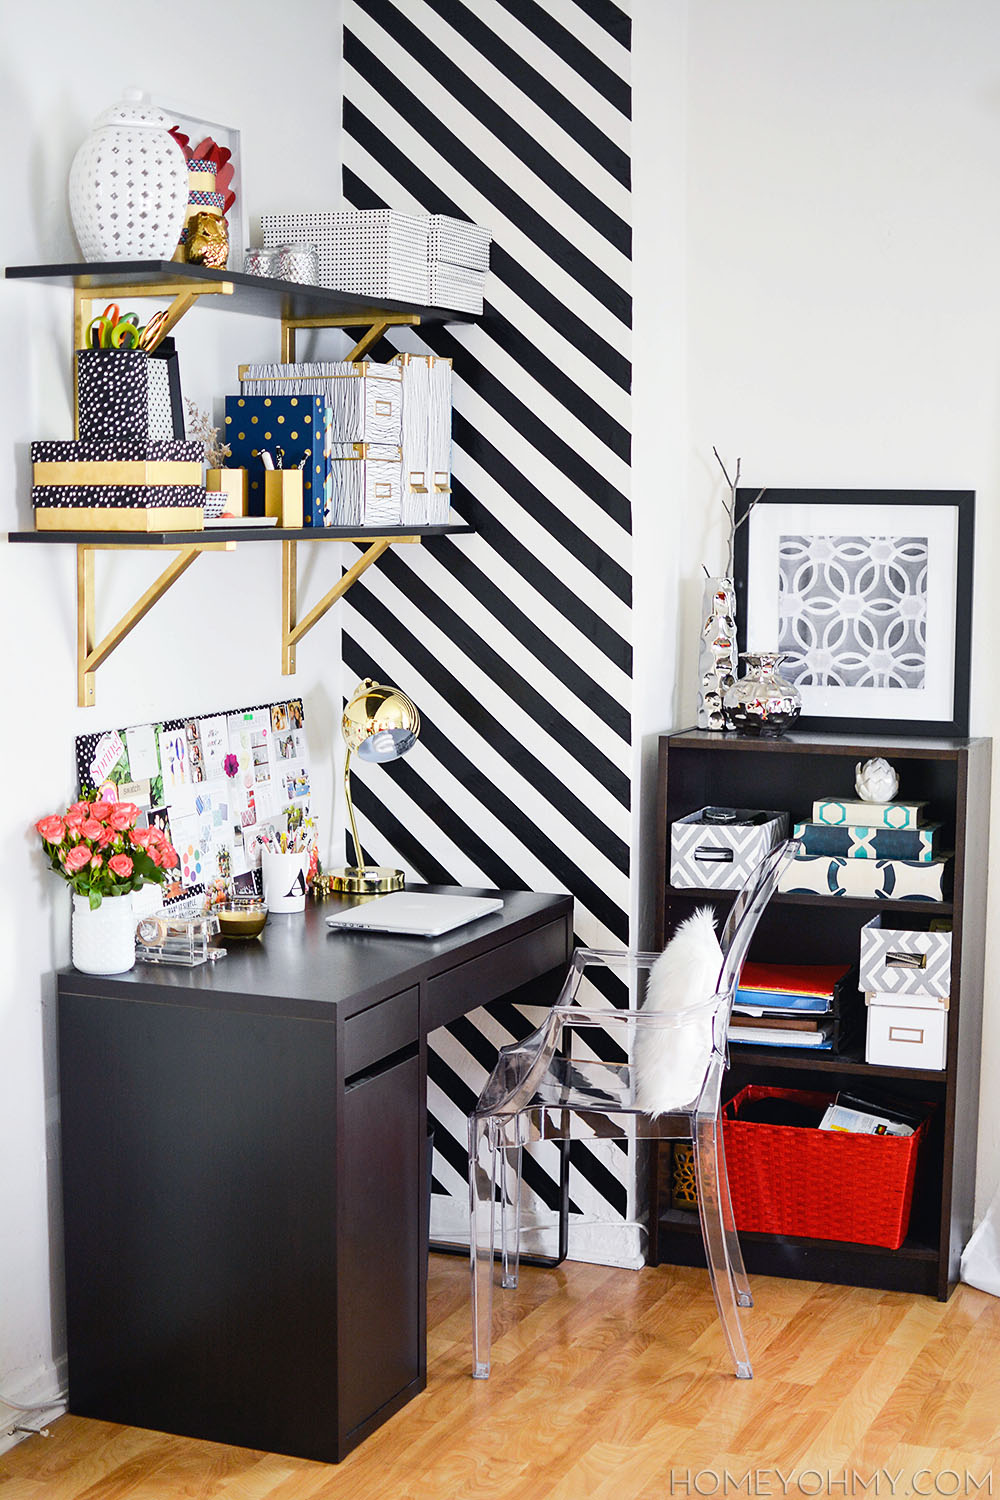
As I had promised, today I’m showing how I created the striped accent wall, which seems to be most everyone’s favorite part of my work space!
Here’s the secret weapon.
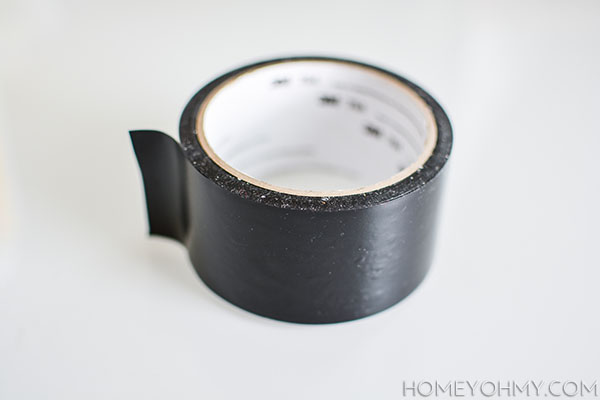
Boom. Black vinyl tape. I got the 2 inch vinyl tape here (affiliate link) and I’m SO impressed with how this worked out. It sticks on strong but can still be repositioned without leaving any residue behind. Especially if you’re like me and live in a rental and don’t want to mess with painting your wall, this is absolutely the way to go.
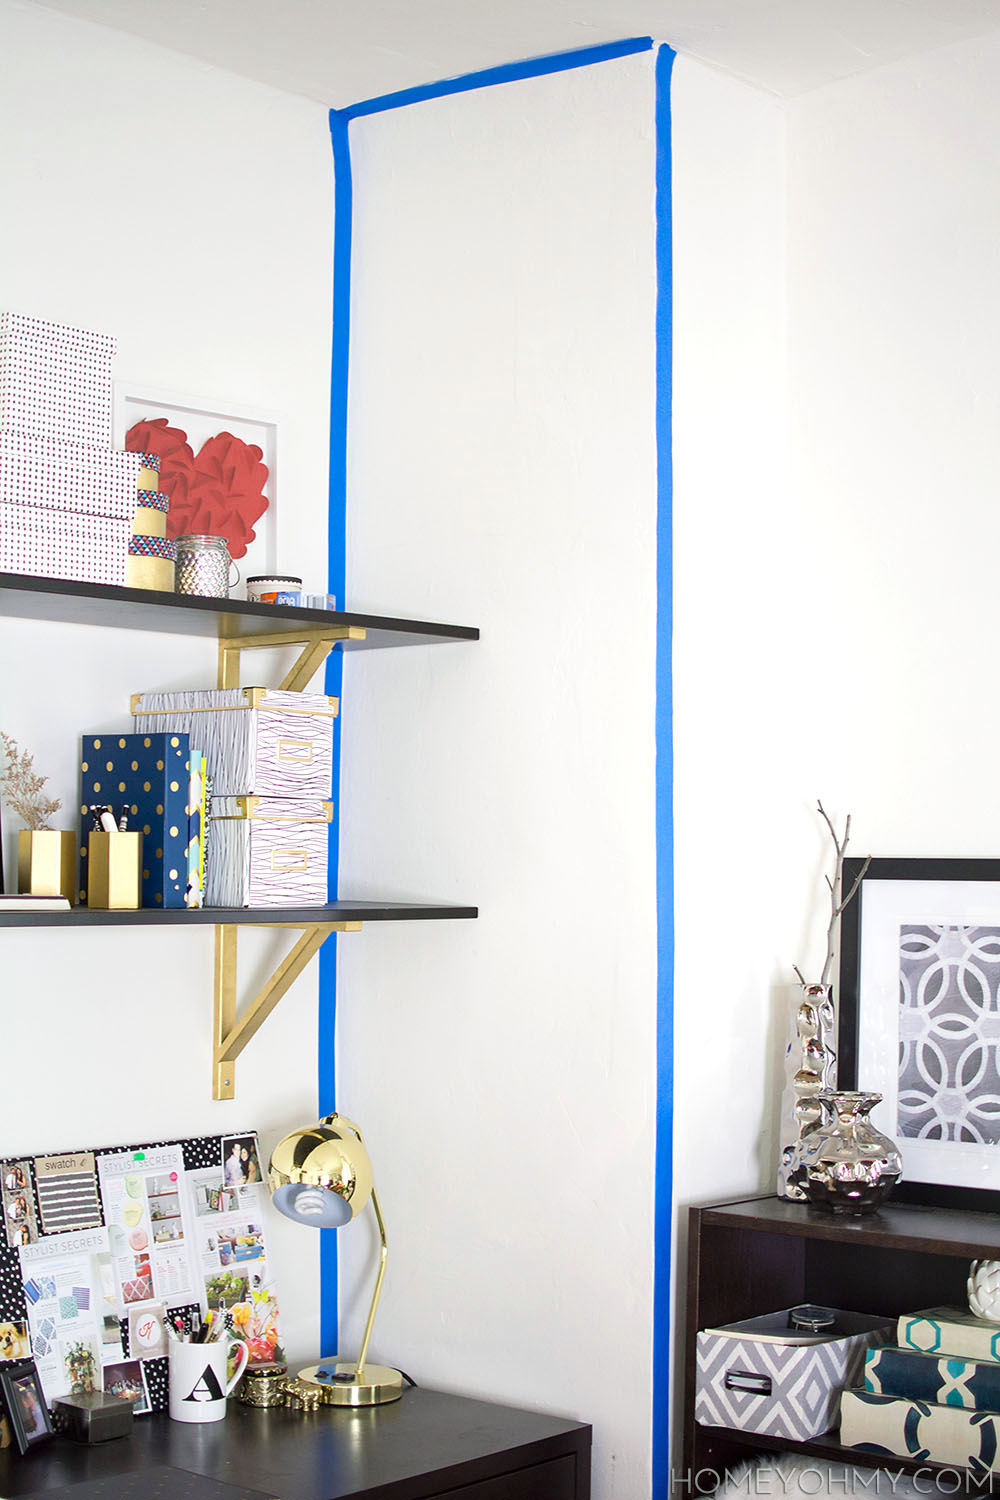
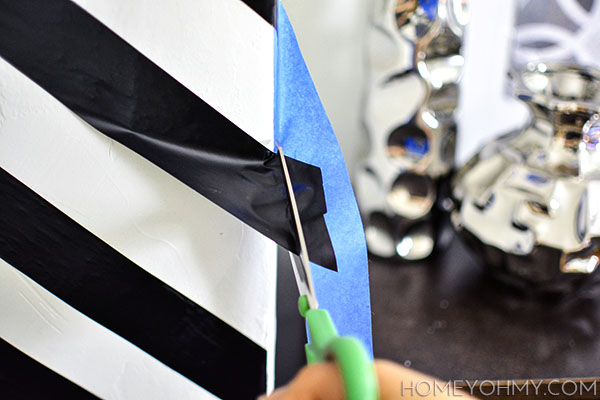
First, I applied painters tape around the outer edges of the wall. I’ll explain why in a little bit.
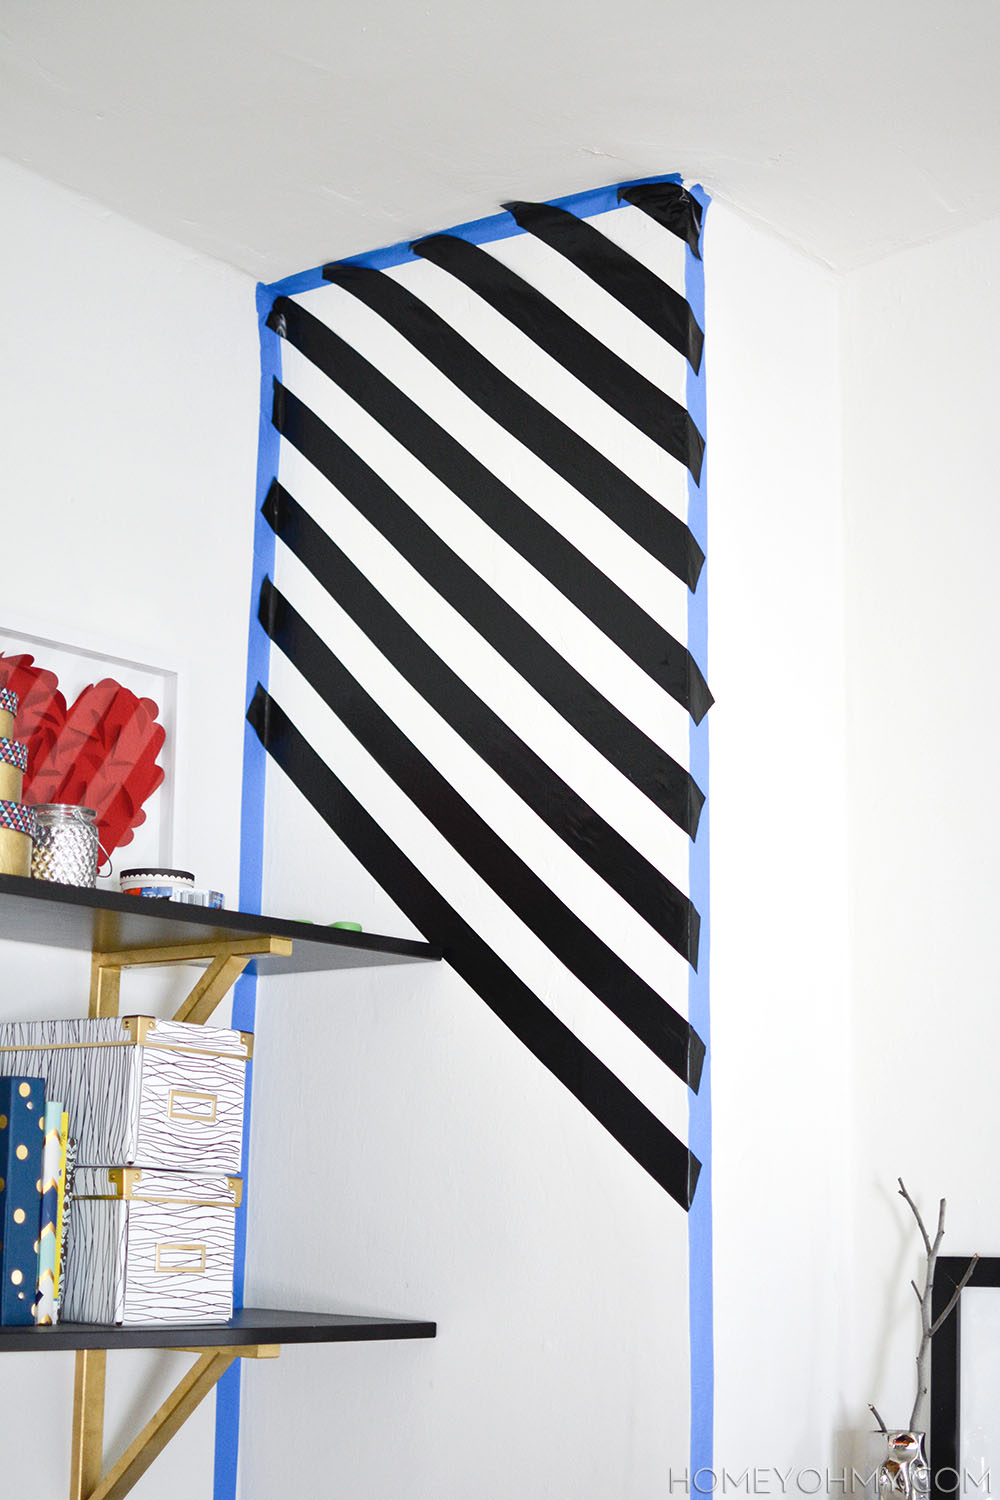
Then I just started taping on the black vinyl tape diagonally, making sure the ends of the tape overlapped with the painters tape. I eyeballed this mostly because my wall is actually pretty warped and uneven. It would have killed me to try and measure things out perfectly, so I just did what looked right, occasionally stepping back far away and making sure it all looked fairly straight and evenly spaced.
After applying all the black tape, I cut along the inner edge of each strip of painters tape as I lifted and peeled it off. The painters tape is there as a guide for where to cut to ensure that the ends of the black tape match up perfectly with the edges of the wall. It did require peeling off the black tape a bit for each stripe, but once cut it just needed to be stuck back on the wall. Neat little trick, yea?
I had thought of a few different options for how to fill up this wall, but this one packed the highest impact for my buck and creates a simple yet stunning focal point for my work space. It also really helps draw the eyes up and emphasizes the high ceiling, making my little corner look just a bit bigger ;).
Was that as easy as you expected it would be? All you need is tape and some patience. Not bad, I say!
PS.
Do you use Bloglovin? It’s how I stay up to date on all of my favorite blogs. Visit my Bloglovin page and follow along to stay connected with me!
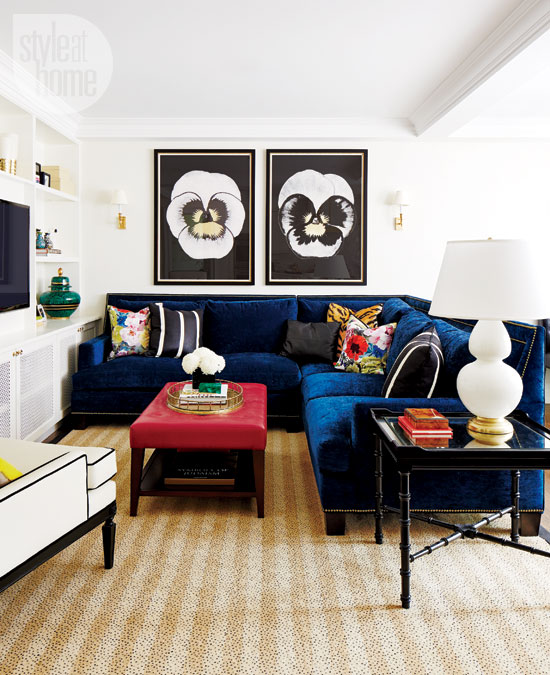
 I recently discovered that I LOVE blue velvet couches. Not only did I notice I’ve been pinning a lot of them, but I found myself wishing my couch was blue when I was photographing my no sew pillow covers, and since then I couldn’t get my mind off of the idea. It’s in these situations I go scouring for inspiration and gawking at all the amazing styling ideas. Do you ever do that? Come, gawk with me.
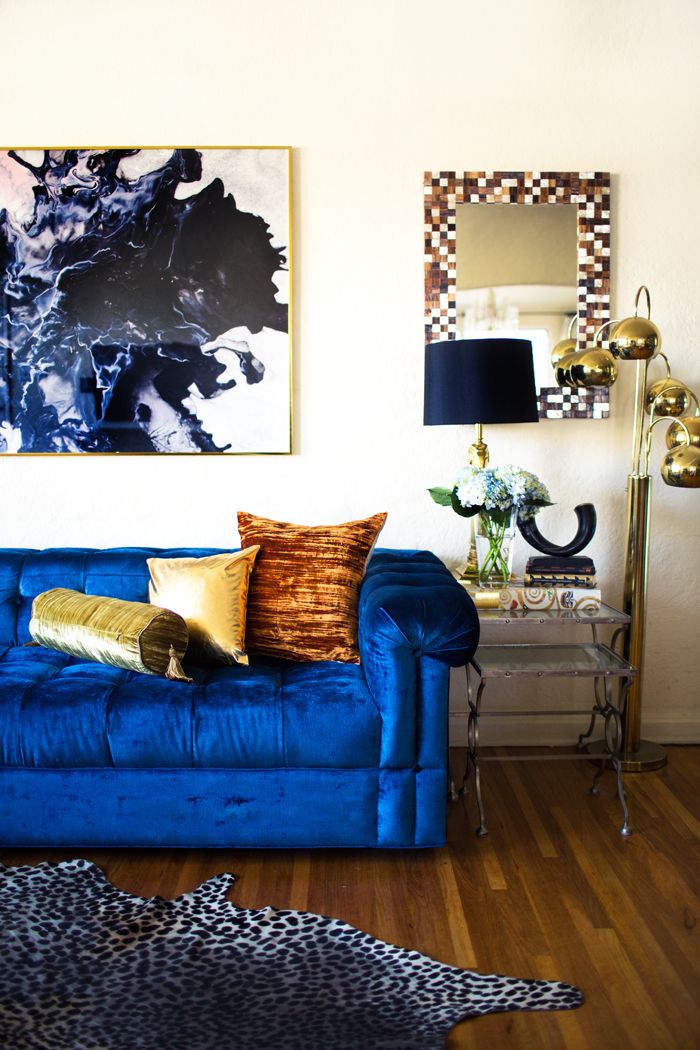
 Not sure what’s going on with the two tone couch here, but I dig it, especially how it looks with that amazing blue rug.
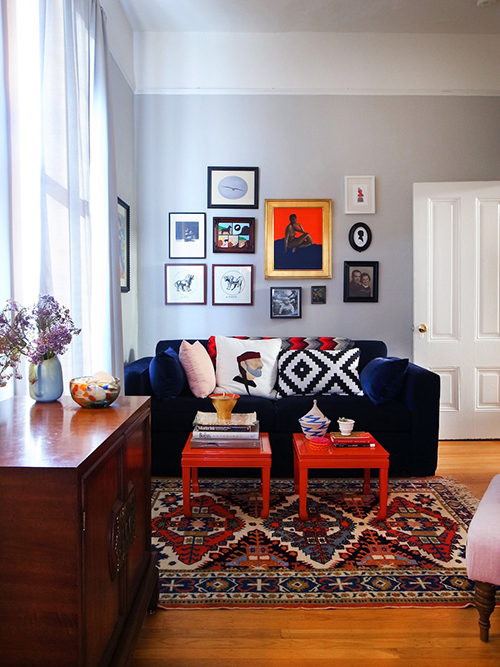
 I’m down for taking a baby step by starting with a blue velvet chair.
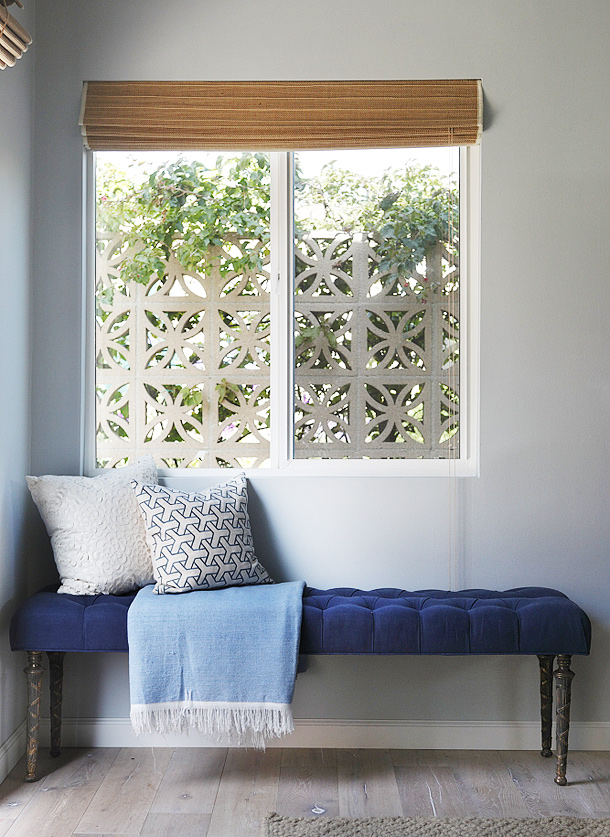 Or a bench!
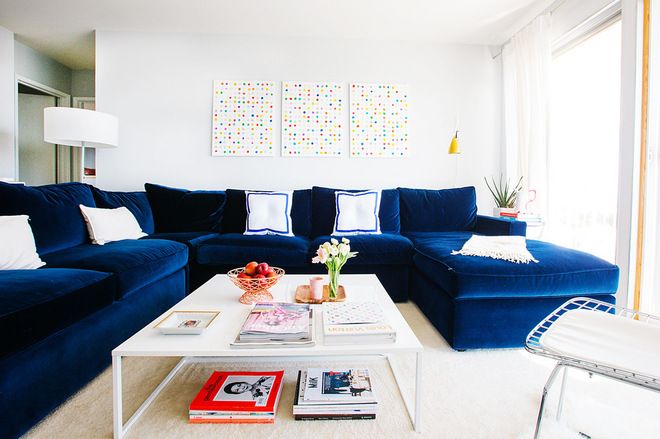
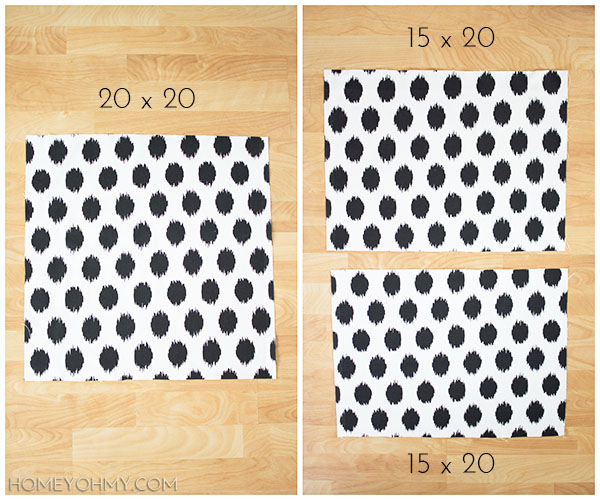 For the ikat polka dot pillows, the pillow inserts are 20 x 20 in., so I measured and cut out a 20 x 20 in. piece and two 15 x 20 inch pieces after ironing the fabric. This will be an envelope style pillow, which is the easiest way to go for no sew.
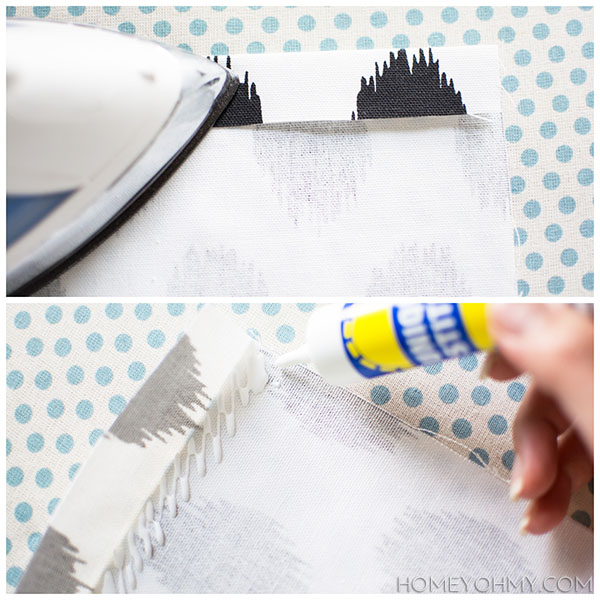 Starting with the 15 x 20 in. pieces, I folded back about an inch on one of the 20 in. sides of each piece and ironed it down. Then I applied the Unique Stitch under the fold to glue it down. This glue is my secret weapon to no sew projects because it holds SO well. I’ve found that the key is to apply enough so that it lightly soaks through the layers of fabric. If I can feel the stickiness of the glue on my fingers as I press down on the fabric after, I know the job is done.
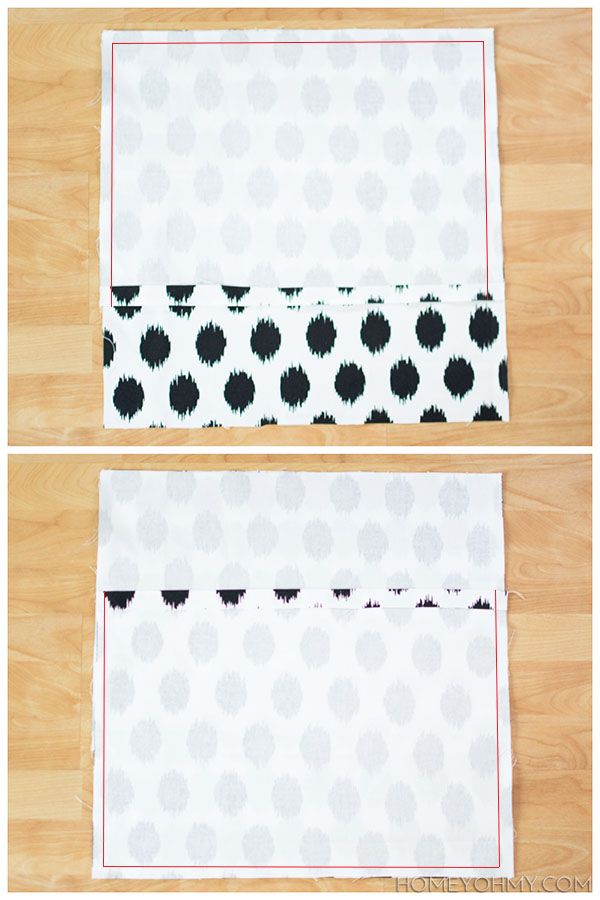 I lined up a 15 x 20 in piece with the top edge of the 20 x 20 in. piece with the fabric faces facing each other. I glued the fabric pieces together where the red lines are in the photo above, which are supposed to be about a quarter inch away from the edges. Then I glued on the other 15 x 20 in. piece lined up with the bottom of the 20 x 20 in. piece. The folded edges of the 15 x 20 in. pieces should be overlapped.
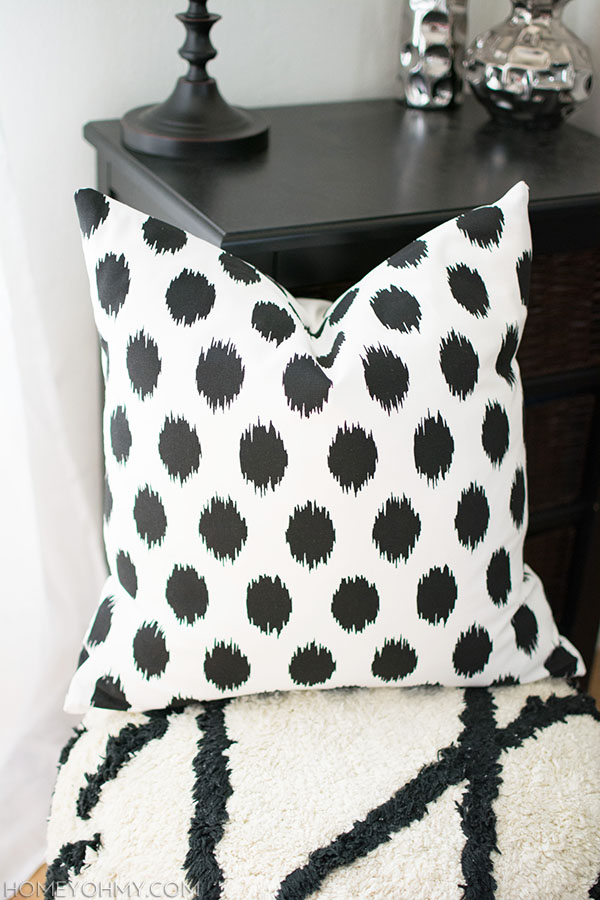 Karate chop that pillow and it’s done!
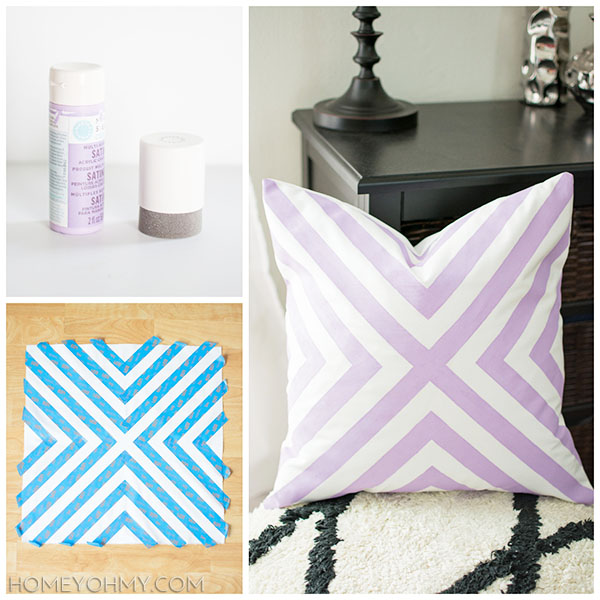
 I’m really liking the way the purple looks on my red couch, and of course the black and white never fails to please me. If you feel like the ikat polka dot pillow looks familiar, it might be because you saw the pattern in the background of
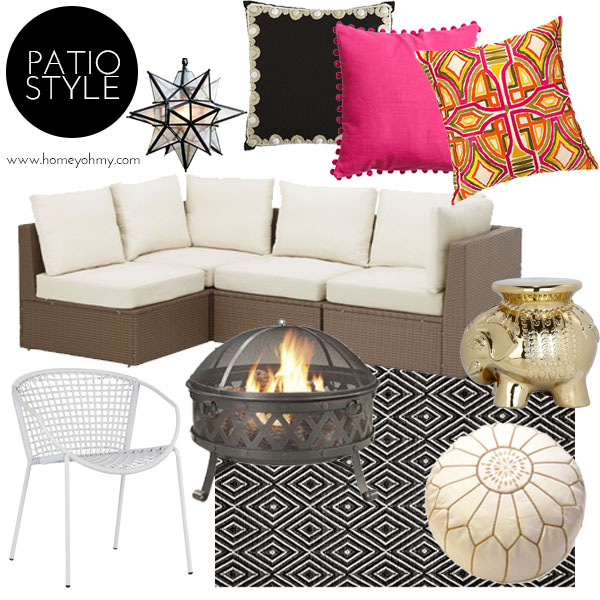
 Another addition to my
 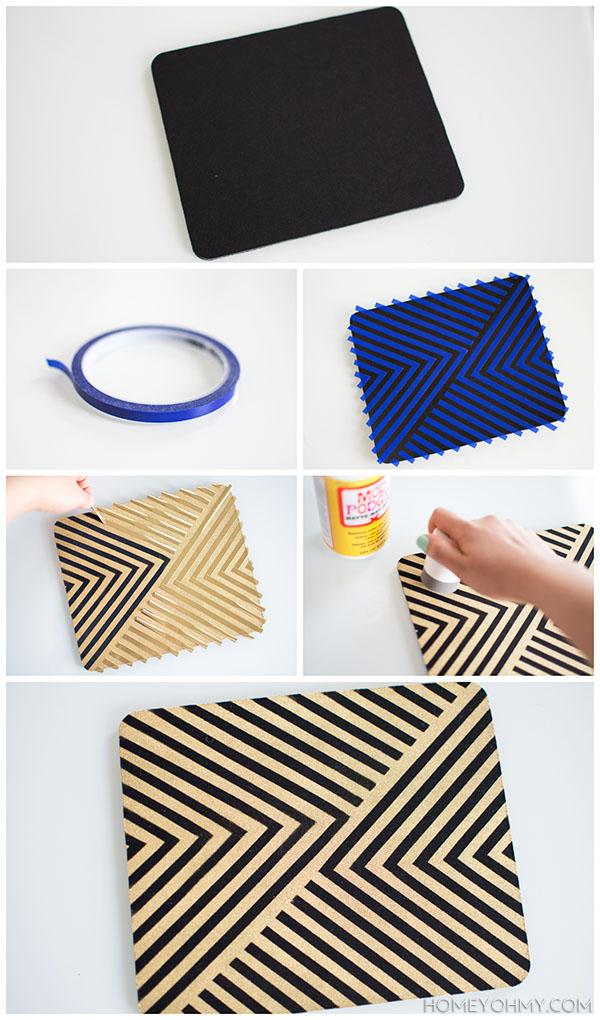 I taped my design on the
  That’s it! Pretty simple, but makes a huge statement, and definitely much better than keeping the mouse pad plain like it was before, don’t cha think?
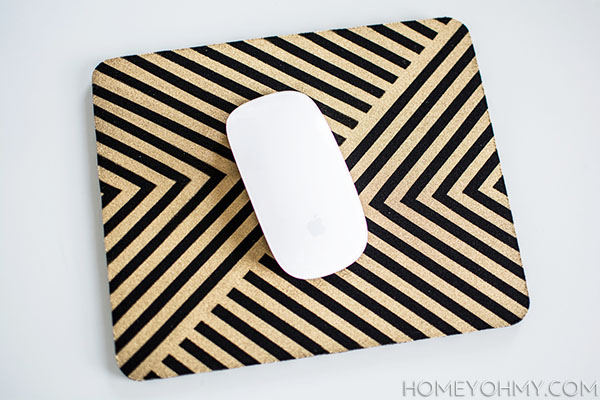
 My favorite mouse pad EVER, and I couldn’t be happier with it. This is actually pretty similar to my